DIY ~Cat Tent

DIY Projects for Your Pet - Easy Cat Tent - Cat and Dog Beds, Treats, Collars and Easy Crafts to Make for Toys - Homemade Dog Biscuits, Food and Treats - Fun Ideas for Teen, Tweens and Adults to Make for Pets http://diyprojectsforteens.com/diy-projects-pets
https://www.instructables.com/id/DIY-cat-tent/?utm_content=buffereb3b5&utm_medium=social&utm_source=facebook.com&utm_campaign=buffer

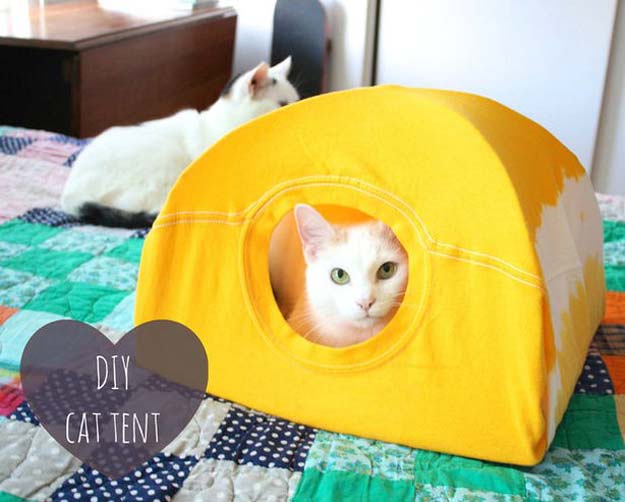
This cat tent is super easy to make – you really just need a t-shirt, some wire hangers and a piece of cardboard. As a bonus, it really only takes five minutes, so if your cat ignores it you didn’t put too much effort in. 😉

Step 1: What You’ll Need:

  • a cat
  • a medium t-shirt
  • a 15 x 15-inch piece of cardboard (mine was 13×15 and a little wonky)
  • two wire hangers
  • tape
  • safety pins
  • something to cut the hangers with and help bend them – I used a large pair of pliers. 🙂
Picture of What You'll Need:

Step 2: Cut the Hangers

Picture of Cut the Hangers

Cut off both squiggly ends. I untwisted mine and then cut, but that’s not really necessary.

Step 3: Shape the Hangers + Reinforce the Cardboard If Needed

Shape the hangers so they look like the above – try to make them smooth and pretty uniform. You want two graceful curves that will go from corner to corner of your piece of cardboard.

I also took this time to tape on a couple supports to the cardboard and tape all around the edges for a little more stability. This is really only necessary if you’re using a piece of cardboard with a crease in it.

Step 4: Poke a Hole in Each Corner

Picture of Shape the Hangers + Reinforce the Cardboard If Needed

You should be able to use the end of the hanger to do this!

Make sure it’s at least a half inch in from each edge and not too large.

Step 5: Tape the Two Hangers Together

Picture of Tape the Two Hangers Together

Cross the two hangers in the middle and make sure all the ends touch the surface you’re working on. Tape them together really well so they don’t shift.

Push the ends through the holes you just made in the corners.

Step 6: Bend the Ends and Tape Them Down

Picture of Bend the Ends and Tape Them Down

Bend at least an inch on the bottom of each hanger so it sits against the bottom of the cardboard. Tape the ends down flat against the cardboard – make sure you tape it well so it’s nice and smooth and won’t snag the shirt when you pull it over!

Step 7: Check and Make Sure Everything’s Lined Up

Picture of Check and Make Sure Everything's Lined Up

At this point you can bend the wire so that it looks nicer – fiddle around with it and use the pliers if you need to straighten it out a bit. 🙂

Step 8: Create a Tent!

Picture of Create the Tent!

Pull the shirt over the tent frame and position it so the neck hole is in the front middle and the bottom of the shirt is trailing behind the tent frame.

Picture of Create the Tent!

Flip the whole thing up so the bottom is facing you and the hole is pointing upwards.

Fold up the excess from the bottom of the shirt and tighten it up so the neck hole is taut and safety pin the bottom in place. Then pull the sleeves tight and safety pin them in place too.

As you can see in the last image, it should be pretty tight over the frame. Keep tucking and safety pinning until it’s ready!

As you can see in the last image, it should be pretty tight over the frame. Keep tucking and safety pinning until it’s ready!

(Yes, I know it would make sense to cut it, but I decided to leave it whole and safety pin it instead so it would be easy to remove and wash. :D)

Step 9: Give It to Your Cat!

I put a paper bag inside as a floor since it’s been pretty hot here and a blanket would be waaaaay too warm. I also put a little catnip inside as a bonus.

DIY~Kitchen Utensil Holder

See the source image

DIY~Tablet Holder and a Notebook

Get those DIY deets here.

They’re ever so simple to make. I’ve made these with the leather scraps I have on hand (I have a giant overflowing bin full!), but these could easily be made with felt, fabric fused to paper with Heat ‘n Bond. Let’s make one together!

EASY Leather-Bound Pocket Notebook Tutorial

istillloveyou-bookbinding-easy-tutorial-leather-book-1

Supplies

Read more to learn how to assembly this easy easy book!

istillloveyou-bookbinding-easy-tutorial-leather-book-2

If you want dot gridded paper, lined paper or blank paper with punch guides, download the free printable here. Cut your paper in half so it measures 8 1/2 x 5 1/2 inches. You will make 2 signatures with 8 sheets.

Fold your paper in half, creasing in the middle with your finger, then creasing outward from the middle with the bone folder.

istillloveyou-bookbinding-easy-tutorial-leather-book-3

Fold both signatures, now you’re ready for punching holes!

istillloveyou-bookbinding-easy-tutorial-leather-book-4

You can use a regular hole punch, but if you’re looking for an awesome punch and rivet/eyelet/snap setter all in one, you’ll want this one (c/o WRM, and I LOVE IT!!!). Use code LOVE at checkout for 20% off. 

You’ll want to measure 1/2 – 3/4 of an inch in from each end and punch a hole along the fold. Download printable dot grid, lined and blank sheets with these hole guidelines here.

istillloveyou-bookbinding-easy-tutorial-leather-book-5

No accurate measuring required, though. Just take the center page of your first punched signature and nest it into the second. Use those holes as a guideline for punching the second set of holes.

istillloveyou-bookbinding-easy-tutorial-leather-book-6

Now you’re ready to prep the cover!

istillloveyou-bookbinding-easy-tutorial-leather-book-7

Cut out a piece of leather, felt or reinforced fabric to 5.5 inches x 11 inches. Line up the edge of the signatures and the edge of the leather up and wrap leather around. You should have some extra on the bottom.

istillloveyou-bookbinding-easy-tutorial-leather-book-8

Pick up the pieces and feel for an indent of your paper holes.

istillloveyou-bookbinding-easy-tutorial-leather-book-9

Mark that indent with your pencil or marker and punch. Most hole punches will go through leather no sweat. Punch those holes.

istillloveyou-bookbinding-easy-tutorial-leather-book-10

On the end that sticks out a little extra, cut two slits about 1/2 an inch long and 1/4 an inch apart in the middle of that section. (see pattern for slits) Be sure to use a protective mat as you cut!

istillloveyou-bookbinding-easy-tutorial-leather-book-11

Cut a length of cording about 18 – 24 inches long. Thread from the outside of the leather to the inside of one of your signatures. Leave a 3-4 inch tail on the outside.

istillloveyou-bookbinding-easy-tutorial-leather-book-12

Thread through the bottom hole back to the outside cover.

istillloveyou-bookbinding-easy-tutorial-leather-book-13

Pull cording tight.

istillloveyou-bookbinding-easy-tutorial-leather-book-14
istillloveyou-bookbinding-easy-tutorial-leather-book-15

Thread the cording back through the first hole, but into the middle of the second signature. 

Thread back to the bottom and the outside cover.

istillloveyou-bookbinding-easy-tutorial-leather-book-16

Pull cording towards the top and bottom of the book to make sure it’s all tight.

istillloveyou-bookbinding-easy-tutorial-leather-book-17

tie a square knot and trim the ends to about 1/4-1/2 inch long.

istillloveyou-bookbinding-easy-tutorial-leather-book-18

Cut a strip of leather 16+ inches by 1/2 inch. Alternatively, you could use a structured velvet or grosgrain ribbon.

Thread the leather through the slits, leaving a 1/2 inch tail on the inside of the cover. Glue down. I used Barge’s leather cement, but PVA or e6000 will work, too.

istillloveyou-bookbinding-easy-tutorial-leather-book-19

Wrap around your book and trim the ends as needed.

istillloveyou-bookbinding-easy-tutorial-leather-book-20

Download the printable insert pages here:

Download the printable cover template (to go with the above pages) here:

*This tutorial/freebie is free for personal use and should not be distributed/republished without my consent. Altering any files is NOT ALLOWED. If you would like to use this freebie for commercial purposes, please email me. Thanks!

DIY~ House Plants Insect Control

Keep houseplants insect free

Using a spray bottle, place a drop of Dawn inside, and fill the rest with water. Shake well and mist your houseplants with the mixture in order to prevent any insects from wanting to eat it or make it their home. The soapy water mixture is a safe and non-toxic deterrent.

Make Your Own Carpenter Bee Trap

Build a Carpenter Bee Trap

They do too much damage to our house, tree house and swing set each year for me to be on good terms with them. I’ve read article after article that says they only go after non-treated, rotting wood, but that hasn’t been my experience at all.

Carpenter Bee Damage

See those holes? They were made by carpenter bees. That’s pressure treated lumber, and they started boring holes in it as soon as we finished building our tree house. They continue to bore new holes in it every spring.

When we built a new roof overhang over the basement a couple years ago, they bored holes through the new cedar supports, before we had a chance to finish them, and they continued to bore holes through them even after we stained them. They’re destructive creatures, I tell you.

So, several years back, my husband and I decided to build some carpenter bee traps to combat the problem. After a ton of research, we came up with our own design, and when we tested them, we couldn’t believe how well they worked.

Here’s a video of one of our carpenter bee traps in action.

https://www.myfrugalhome.com/how-to-build-a-carpenter-bee-trap/

Tools Needed:

Circular saw (or a hand saw)
Drill
1/2″ wood bit
7/8″ wood bit
1/2″ metal bit
Square
Punch
Hammer
Tape measure
Screw driver
Pencil

Supplies Needed to Build a Carpenter Bee Trap

Materials Needed:

4×4 post (A scrap of one is fine. You just need seven inches.)
(1)Mason jar (half pint or a regular mouth pint)
(1)Screw eye
Wood screws

What You Do:

Mark Your Angle

Step 1: Measure seven inches up from the end of your 4×4. Then, draw a 45-degree angle that radiates down from this point.

Cut Your Angle

Step 2: Use a circular saw or a hand saw to cut the angle that you just marked.

Cut 4x4

This will leave you with a block of wood that is seven-inches tall in the back and four-inches tall in the front.

Drill a Hole through the Center of the 4x4

Step 3: Flip your 4×4 piece over, so that the flat bottom is facing up, and mark its center. Then, drill a 7/8-inch hole at the center point that is approximately 4-inches deep. Take care to keep your hole straight.

Drill Holes at a 45 Degree Angle

Step 4: Now, mark the location of your entry holes on the four sides of your block. Each hole should be two inches from the bottom and one and three-quarter inches from each side. Use your 1/2-inch wood bit to make your holes at an upward 45-degree angle. Continue drilling until your hole connects with the hole that you drilled from the bottom. Then, repeat with the remaining holes.

Drilled Holes

Here’s what your block should look like at this point.

Punch Holes in Your Jar Lid

Step 5: Unscrew the lid from your jar, and lay it on a piece of scrap lumber or a heavy metal plate. Find the center of your lid and mark it. Then, divide the distance between the center hole and the lip to find and mark the spots that you’ll use to screw the jar to the trap. Use a punch to make your holes.

Drill a Hole Through the Center of the Jar Lid

Step 6: Use a 1/2-inch metal bit to make the center hole larger. Leave the other holes as is.

Screw the Lid onto the Base of the Trap

Step 7: Stick the lid back inside its ring, and screw the lid onto the bottom of your trap, taking care to make sure the 1/2-inch hole on your lid lines up with the 7/8-inch hole at the base of your trap.

Finished Carpenter Bee Trap

Step 8: Add a screw eye to the top of your trap and hang.

Carpenter Bee in Trap

How the Trap Works:

Carpenter bees discover one of the outer holes and crawl inside it to lay eggs. Once inside, the 45-degree tunnel casts their entry point in the shadows. They see light coming up from the hole at the base of the trap, and move towards it, assuming it’s the exit. Instead of finding their way out, they find themselves in the jar, and can’t figure out how to get back out. Victory!

We hang our traps where we’re seeing carpenter bee activity. Then, we treat the holes they’ve bored with Spectracide Termite Killing Foam (it’s formulated for carpenter bees, too). Afterwards, we fill the holes in with caulk or wooden dowels. If we’re short on time, we just cram a stick up the holes until we have time to make a more permanent fix. But it’s definitely important to block the holes right away because it forces the bees, who weren’t in their nests when you sprayed, to go in search of new nesting sites, and it also kills the larvae they’ve laid, so you don’t have more bees hatching out next year. Carpenter bees will build their nests in existing holes, if they can find them, so if you have a trap full of carpenter bee-sized holes hanging near by, they’re likely to crawl inside to check it out, and when they do, you’ll have them trapped.

Note: Spectracide now also sells Carpenter Bee and Ground Nesting Yellow Jacket Killer Foam. It has the same active ingredients as the termite foam, so use whichever one you’re able to find.

Carpenter Bee Trap


DIY~Pest Control

Non-toxic pest killer for garden

Avoid using nasty toxic chemicals in your garden and opt for Dawn dish soap instead. Although a Dawn and water mixture won’t kill all insects, it’s wonderful for repelling spider mites, aphids, and other common garden pests. Home Guides at SF Gate has more information.

DIY~Carpet Cleaner

Easy-to-make carpet cleaner

If you have a nasty stain on your carpet, you don’t have to rush to the store for expensive carpet cleaners. This DIY concoction will have your carpets looking brand new in no time. In a spray bottle, mix 2 ounces of hydrogen peroxide and 1 ounce of Dawn dish soap. Spray the stain or problem area and scrub with a rag. Finish by spraying with plain water and scrubbing to remove any remnants of the stain as well as the soap.

DIY Cleaning products

Dish Soap: Adding essential oil to unscented castile soap can help take the drudgery out the ordeal. I like to add 10 drops of lavender oil and 10 drops of tea tree oil to 20 ounces (600 ml) of castile soap and then decant into a simple glass bottle with a pour spout for keeping on countertop.

Read more: http://www.oprah.com/home/all-natural-homemade-cleaning-products/all#ixzz5fudqmuEI