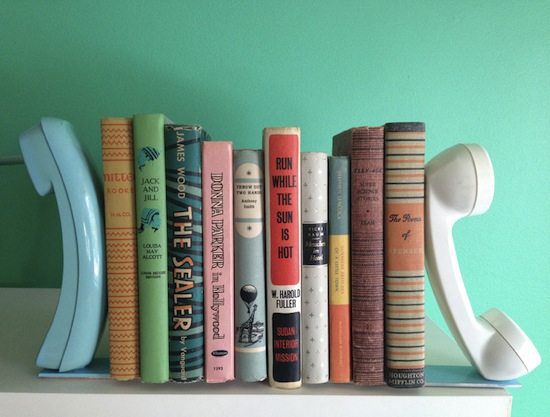
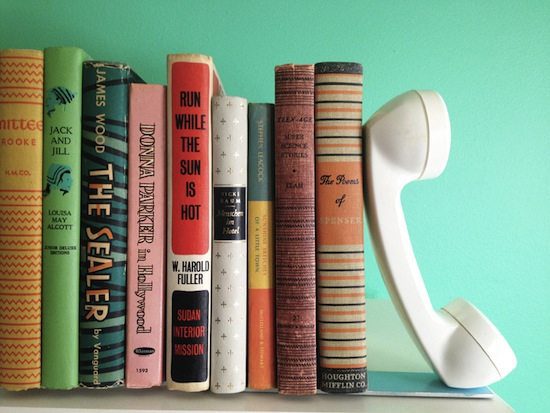
Holly Marsh set out to conquer the entryway clutter issue by turning a common household item into a clever organizational system. She found this vintage shutter at a local thrift store and hung it up next to the back door where everyone comes and goes. Then, she placed S hooks and clothespins on the wooden slats to hold everyone’s keys and outgoing mail, invitations and other important memos. An old wooden box below keeps often-worn shoes contained, too. Now there’s no excuse for missing keys, lost invites or misplaced bills.
Next time you’re enjoying a hot cuppa joe from your favorite coffee spot, instead of tossing the paper container, take it home to repurpose into a homemade candle. Use leftover wax candle ends, along with a sprinkling of used coffee grounds, and you’ve got a fun and eye-opening candle to scent your home or give as a gift.
What You’ll Need:
Small paper coffee cup
1 to 2 tablespoons used coffee grounds
Paper towel
1 cup wax candle remnants
Candle wick
Scissors
Small saucepan
Small metal or glass mixing bowl
Directions:
To create the base of the candle, add 1 cup of wax candle remnants to a small metal or heat-safe glass bowl, and place over the top of a small saucepan filled halfway with water, creating a double boiler. Bring the water to a simmer and watch closely until the wax has melted, which takes about 5 minutes.
Give the paper coffee cup a good cleaning, and wipe to make sure it’s dry. Place the coffee grounds in a paper towel, and squeeze to release any extra liquid. Position the wick in the center of the cup, and sprinkle a layer of the coffee grounds at the base. You can find candle wicks at your local craft store.
Carefully pour half of the melted wax over the coffee grounds, reserving the rest of the wax for the top of the candle. Let the wax harden for 20 minutes.
To create the second layer of the candle, sprinkle the cooled wax with another spoonful of coffee grounds. Rewarm the wax in the double boiler, and top off the candle.
Let the candle cool for at least an hour, and then cut away the coffee cup to reveal the finished candle. If needed, smooth the edges with a paper towel, and trim the end of the wick to fit the candle. Find the perfect spot to display your candle, and enjoy the subtle coffee scent.
A list of kitchen organization ideas would not be complete without a spice rack solution. This spice rack could not be easier. Vintage Coca-Cola crates already have the perfect compartments. Simply hang it up and add your spice jars. Source: BROhaha
Don’t let those plastic straws end up in a landfill! When you’re done slurping up your iced coffee, save your straws to make a few of these gorgeous faux copper air planters.
What You’ll Need
6 plastic straws
thin, flexible floral wire
copper spray paint
air plants
needle nose pliers
DIY Faux Copper Air Planter
Don’t let those plastic straws end up in a landfill! When you’re done slurping up your iced coffee, save your straws to make a few of these gorgeous faux copper air planters. P.S. – they make great gifts.
Photo by: Jalynn Baker
Jalynn Baker
Cut Straws
DIY Faux Copper Air Planter
Don’t let those plastic straws end up in a landfill! When you’re done slurping up your iced coffee, save your straws to make a few of these gorgeous faux copper air planters. P.S. – they make great gifts.
Photo by: Jalynn Baker
Jalynn Baker
Cut three 7-inch straws, three 5-inch straws and three 2.5-inch straws.
Create First Triangle
Jalynn Baker
Image 1
Jalynn Baker
Image 2
Jalynn Baker
Image 3
Jalynn Baker
Image 4
DIY Faux Copper Air Planter
Thread a long piece of wire through two 7-inch straws, leaving about 30 inches of excess wire on one end (image 1). Use needle nose pliers to create a bend in the wire between the two straws (image 2). Thread a 2.5-inch straw onto the short side of the wire, bending the wire between it and the 7-inch straw to form a triangle (image 3). Twist the open ends of wire together to close the isosceles triangle (image 5).
Make the Top Pyramid
Jalynn Baker
Image 1
Slide the long end of the wire back up through the first 7-inch straw (image 1) and thread another 7-inch straw onto the same wire, bending the wire between the two straws (image 2). Then, bend the excess wire at the end of the straw to hold it in place.
Jalynn Baker
Image 1
Jalynn Baker
Image 2
Jalynn Baker
Image 3
Jalynn Baker
Image 4
Image 1
Thread a 2.5-inch straw onto the same wire, to the bend (image 1). Bend the wire, then thread it back through the first 2.5-inch piece, connecting the two 2.5-inch straws and creating half of the pyramid base (images 2 & 3). The two wires should now meet. Bend the long wire at the corner, then thread another 2.5-inch piece onto it, creating a triangular base (image 4). Wrap the long wire around one corner of the base to secure (image 5).
Make the Bottom Pyramid
JalynnBaker
JalynnBaker
Thread two 5-inch straws onto the long wire, bending the wire in-between each straw to create a triangle (image 1). Connect the triangle to the base by threading the wire back through one of the 2.5-inch pieces (image 2).
JalynnBaker
Image 1
Thread the final 5-inch piece onto the wire (image 1), bending the wire to hold it in place. Thread the wire back up through one of the other 5-inch straws and secure wire to the base by twisting the excess wire together (image 2).
Finish It Up
DIY Faux Copper Air Planter
Don’t let those plastic straws end up in a landfill! When you’re done slurping up your iced coffee, save your straws to make a few of these gorgeous faux copper air planters. P.S. – they make great gifts.
Photo by: Jalynn Baker
Jalynn Baker
Cut off excess wire, clamping the raw edges with pliers to avoid snagging. Attach another piece of wire to the top of the planter for hanging, then paint with copper spray paint.
DIY Faux Copper Air Planter
Don’t let those plastic straws end up in a landfill! When you’re done slurping up your iced coffee, save your straws to make a few of these gorgeous faux copper air planters. P.S. – they make great gifts.
Photo by: Jalynn Baker
Jalynn Baker
Place an air plant (Tillandsia) in the middle base of the planter, hang and enjoy! When your plant’s ready for water, take it out of the base, soak thoroughly in a bowl of lukewarm water and sit it upside down on a paper towel to dry.
Hanging racks are ideal for pots and pans. This wall of reclaimed wooden staves is a functional and artistic take.This magnetic knife rack is perfect for keeping knives handy but also out of the way. Make one for yourself with a piece of reclaimed wood and a forstner drill bit. This drill bit allows you to make circular holes on the back of the board without going all the way through. You can then glue in magnets to hold up your knives. Source: eHow