
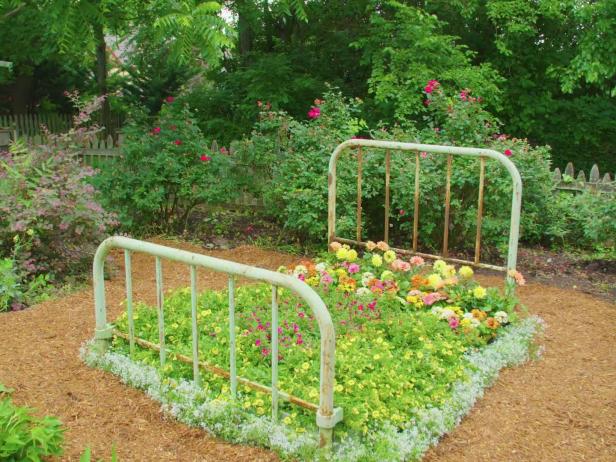
Tag: Upcycle
Spring Craft

Upcycle Christmas Ideas


Upcycle This!

Upcycle Idea, Link Share
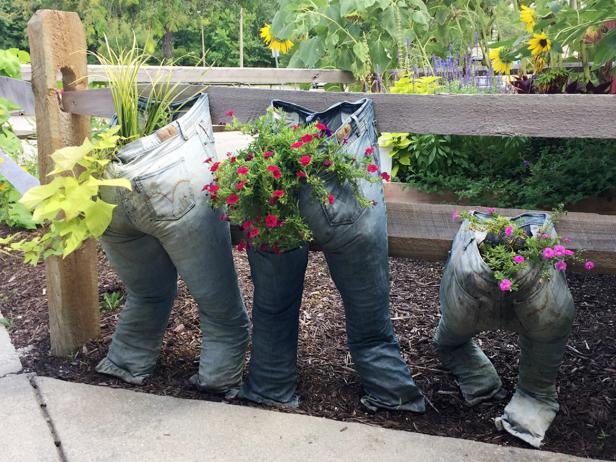
Upcycle Idea Link Share
Upcycle This~Windows
WINDOW COFFEE TABLE
It should come as no surprise that with our passion for old items and repurposed treasures, we are also mad about collectables. Vintage trays, antique keys, He-man and the Masters of the Universe collection, if it’s from an era bygone we are into it. But with this kind of hobby comes a need for display cabinets, and the best kinds of display cabinets are multi-functional. Enter the window coffee table. This clever unit combines our love for collecting with our passion for upcycling, turning an old window into a display coffee table. Brilliant.
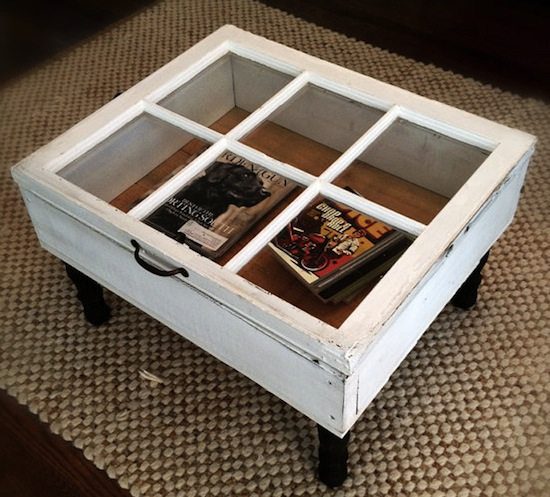
When you take a good look at this window coffee table you will see that the construction is actually quite simple. It is comprised of a salvaged window placed on top of a wooden frame with some unfinished wood as the backing. Add some table legs and you’ve got a complete window coffee table. It’s so simple and so gorgeous that we’ll bet you’re gonna start looking at old windows a bit differently. Here’s how to make your own.
How to make a window coffee table
To make your own window coffee table first measure your window. Now decide if you’d like your table to have a lip with the top of the table hanging slightly over the bottom. If so subtract an inch from the length and width from the measurement and build your window base to this specification. Otherwise cut your 2x4s to the exact measurements. These 2x4s will become the box that the window rests on. Cut a sheet of plywood to the same size as the 2×4 base. Screw the 2x4s together, attach the sheet of plywood to the bottom and flip this box over. With the plywood sheet on top, pre-drill holes in each corner and screw in the wooden coffee legs. For this project you can use salvaged coffee table legs or even buy ready made ones.

Now flip the table back onto it’s legs and attach the hinges to the window frame and top of the 2×4 frame.
Next prepare the window coffee table for paint by sanding down the window frame and wooden box. Prime the wood and let it dry. Next prep your window for paint by lining the window panes with tape to avoid getting paint on the glass. Choose your paint treatment and decide how much of a vintage look you’d like your coffee table to have. From crackle paint to high gloss it’s up to you.
Paint and then allow time for your window coffee table to dry. Complete the project by adding a handle to the window pane top. Place your collectibles inside and admire your handiwork. Ready for more upcycling ideas?
Image source: Oh Glory Vintage
Upcycle~ Magazine Side Table

Ingredients:
- Old catalogues or magazines (they should be of the same size)
- A record (or alternative table-top)
- Paperclips
- Coloured sticky/duct tape
- All-purpose glue (or hot glue)
Firstly, take a magazine and open it to the 10th (or so) page. Roll it up to the left until the left edges of the pages touch the spine of the magazine.


Roll up the next 10 pages (you don’t have to count, just estimate it 🙂 ) until their edges touch each other. Then fix it with a paper clip as close as possible to the back of the magazine.

Repeat the second step until you’re at the second to last page. The last page shouldn’t be rolled up, yet.


Now you need the next magazine of the same size. Put the last page of the first magazine on top of the cover of the second one and roll them up as before, together with the first few pages of the magazines.


Repeat this until you think it is enough 🙂 (It depends on the thickness of the pages and how many pages your magazines have.) Don’t roll the last few pages, yet.


Now stand the whole thing up (hereby the paper clips are important, otherwise the pages might open again). Now you can roll in the last pages and fix them to the first pages of the first magazine using a paper clip.


Next you stick the sticky tape around the whole thing on top and again on the bottom.

Now you can remove the paper clips and make the second level as you did the first. It is important that the magazines of one level are of the same size, but all the levels don’t necessarily have to be even. However you prefer 🙂
Make as many levels as you want, depending on how high you want the table to be.
Now cut a piece of paper so that it matches the top of the table leg (in a circle) and stick one piece on top of each level. Glue the levels on top of each other and glue the record on top.


Done 🙂 I hope this was understandably phrased!
At our place the environmental-friendly table embellishes one corner of our living room together with my globe lamp 🙂


At my brother’s there is also one of my tables 🙂


