Some kind of Chop, Miter, Slide, or Circulating Saw to cut the boards. A good hand saw, if that’s all you have, will do.
Sandpaper, if you want it to look nice
Step 1: Materials
For this project, you can pretty much use any chunk of wood you have lying around. Other than than that, you need a few flat boards, such as shingles, and some board to attach it to. I’m pretty sure the shingles don’t actually make the bees want to move in any more than without them, but they make the finished project look kind of cute.
I figure the best way to do this is to have your bee house attached to something solid such as a post or tree, although I have seen ones that are meant to hang from something, but that seems like it wouldn’t be so good in the wind. You can choose either way, but I go with attaching them to something solid with a backboard.
Step 2: Cutting Your Blocks to Size
2 More Images
Since you can really get any deeper than what you drill bit can reach, that’s about how long the logs should be. Just eyeballing the first one, it pretty much just needs to be cut in half, same as the one to the right, the block to the left being pretty good size already.
Remember, safety first! Ear protection is a must when operating loud saws! Feel free to use eye protection as well.
I went ahead and cut the split log on the slide saw that I usually use, but the round log was too large a diameter, so I used my chop saw on it.
Now I have 5 pieces to choose from to start my bee house.
Now it’s time to drill the holes, which is half of the project in itself. An electric hand drill would work as well, but I found my drill press to be much more suitable. I drilled down as far as I could with the bit and my press, which was around 3-4 inches. The split log took a bit longer since it’s some kind of semi-hardwood, but I eventually got it done. For something this size, a minimum of 16 holes seems good.
Now, there are a few things I chose not to do here. The first, I did not make any kind of markings as to where I wanted the holes, I just drilled in a more or less organized fashion. The spacing is important, so I kept them far enough apart, but the overall layout doesn’t really matter to the bees nor to me. The second, I did not use any other size bit, only a 3/8 bit, so there might be some bees that might not be able to live here. I might use other bits in the future, but not this time.
I encourage everyone to do their own research on this, as I am only covering the simplest way possible to make a bee home.
Step 4: Fitting the Shingles
3 More Images
Since this is supposed to resemble a small house, the shingles will be used for the ‘roof’.
First, I just stood them up about how they needed to be, and marked about how long I wanted them. After that, I went and cut them both on the slide saw, which I didn’t get a picture of. Next, you just nail them on real quick. I just used these little nails, four of them for each side. The shingles were a bit to wide for the split log piece, so I had to chop them up a bit; I’m sure you can compensate for whatever for you use. After you get the shingles marked, cut, and nailed on, you should have a block of would that hopefully now resembles a small house. Very enticing to those Mason bees that need homes.
Do your best not to put the nails into the holes you drilled.
Step 5: Attaching the Backboard
Next, I just laid the house on the board I planned to cut up for the backboard and once again, eyeballed about where to cut, and measured to the nearest inch. I marked it, and cut a few lengths to use. Attaching them is easy, just turn it over and pound a few nails in there. The little nails seemed good enough for this too, so I didn’t bother looking for longer ones. Again, try not to nail into the holes.
How to Turn Broken Wine Glasses Into Awesome Coconut Planters
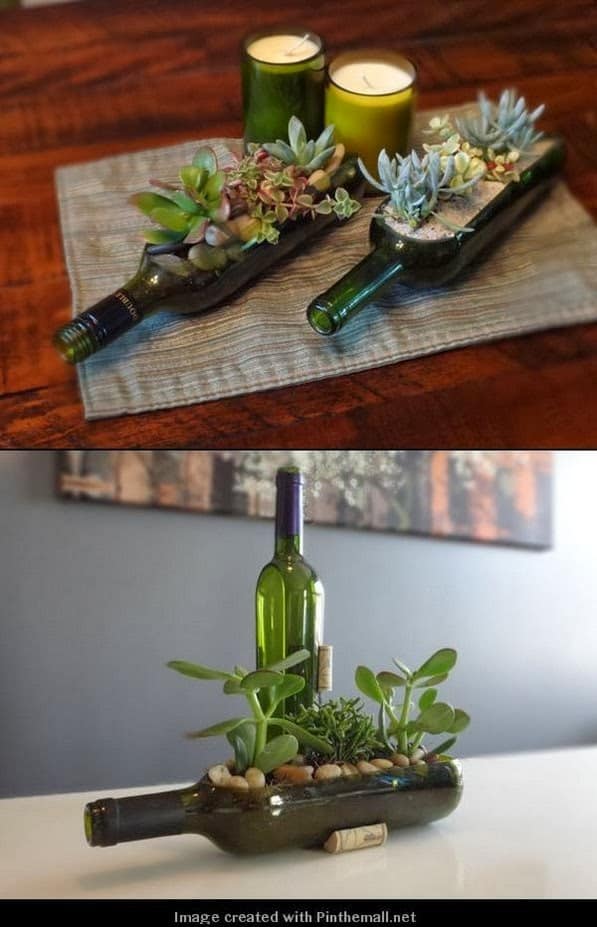
What is it with wine glasses? They always seems to break off near the stem when they drop. Which happens quite often in our house. Yup, we like to party. Not the drugs, sex and rock and roll kind of parties, mind you. More like big bonfires, drumming circles and kumbaja till the early hours of the morning. So when our wine glasses break, what do we do? We turn them into fairy garden cloches or make these awesome coconut planters. It’s way more fun than just throwing them away 😀
They look stunning as a rustic center piece and can be made in a few hours. So grab those broken glasses and some coconuts and let’s get cracking shall we 😉
First things first. Cutting the coconuts and getting all the yumminess out to use later.
How To Cut and Clean A Coconut
We prefer to buy our coconuts fresh, since it works out cheaper and I love the taste of the meat when it hasn’t been desiccated yet. It’s not so coconutty 😀 Did you know that the dried meat inside is called Copra? Me neither, LOL. Anyways to cut and clean the coconut you’ll need a glass (to drain the milk), hacksaw and a knife. Remove all the hair on the outside of the coconut. Don’t throw it away. You can use the hair to make these adorable miniature bird’s nests. Look for three little indents at the bottom of the coconut. One of the indents will feel more squishy than the others.
Grab a sharp knife and dig that little squishy indent and the meat behind it out.
Flip the coconut onto the glass and drain the milk. Once it’s empty you can use a hacksaw to cut it in half.
Scoop the meat out with a knife and save those inside bits for later. You can hop on over to my friend Jas’s delicious cooking site to get some amazing coconut recipes BTW.
Turning the Broken Wine Glasses and Coconuts into Planters
Eye ball the thickness of the wine stem and grab a drill bit that’s a little bit thicker and make a hole in the bottom, center of the coconut half. You’ll only need to drill into one of the halves since the indents should be wide enough for the stem of the wine glass to fit into. Don’t forget to drill a few small drainage holes too 😉
Mix up some strong all purpose glueand attach the wine stem to the coconut half. We used Pratley Steel Quickset but any waterproof, non-toxic glue like E6000 should work.
To hide the glue we just used some of the coconut hair that we removed earlier.
Once the glue has dried you can start filling the planters.
We put succulents in ours. The spikey job in the picture above is a Gasteria Flow, I think. They’re often confused with Aloes, but they require less light and make ideal house plants. They get their name from the sac-like shape of their flowers, which are supposed to resemble a stomach, hence the name gasteria, 😀 Ours have never flowered so I’m not 100% sure. Pot the offsets in a small pot, using the same soil as the mother plant and put it a warm, bright spot. Add a little bit of perlite to the mix to help aerate the soil and help retain water. It also makes the soil much lighter.
The little trailing plant is a Crassula pellucida. One of my all time fav indigenous succulents. She’s super easy to grow. Just cut one of her trails off and stick it in the ground. Each little leaf produces roots and a new plant will form in no time.
So next time someone breaks a wine glass, don’t throw it away. Save the bits and turn them into coconut planters instead.
It’s surprisingly easy to transform a water bottle (or whatever plastic bottle you have on hand) into a DIY sprinkler. All you need in addition to your empty bottle is electric tape and a screwdriver, and you can create a fully functioning sprinkler in as little as five minutes.
Want to give your water bottle a second life and beautify your garden at the same time? Then turn your old plastic bottle into a bird feeder! Simply cut a hole into the side of your bottle and fill it with seed (as pictured here).
Want to give your water bottle a second life and beautify your garden at the same time? Then turn your old plastic bottle into a bird feeder! Simply cut a hole into the side of your bottle and fill it with seed (as pictured here).
Or, if you want to take things one step further, you can stick two spoons through your bottle and create little feeding posts, just like blogger Manuela Waliczek-Raczka demonstrates here.