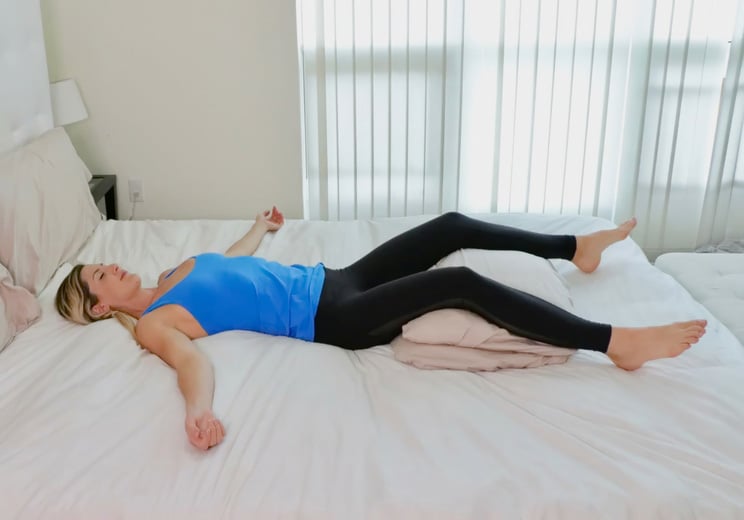
Finish with the king of all relaxation yoga poses, otherwise known as Corpse Pose. Savasana helps put your body in ideal anatomical alignment to promote deep relaxation. If you haven’t fallen asleep already, this will surely send you off to dreamland.
Lie flat on your bed and stack two pillows underneath your knees.
Open your knees about shoulder-width apart, or as wide as you can while comfortably keeping them propped on the pillows.
Stretch your arms out to your sides with palms facing up.
Lift your chin slightly up to face the ceiling to allow for smooth breathing.
Begin your deep breaths and don’t fight the urge to fall asleep. This is a great pose to spend the entire night in.
About Jessica Gouthro
Jessica is a NASM Certified and Prenatal Certified Personal Trainer, Fitness Nutrition Specialist, and co-host of the popular YouTube show Live Lean TV. She has over 12 years of experience in fitness and nutrition coaching, and she has clients all over the world.
When she’s not shooting fitness and nutrition videos, writing workouts, creating recipes, or working with clients, she enjoys long walks on the beach, fun workouts, and spending time with her husband, dog, and baby-on-the-way!
People of all age groups suffer due to memory loss or frequent forgetfulness at some point in their life. Mental stress or unnecessary thinking, pressure related to personal as well as professional life, extremely hectic schedule throughout the day, etc. could be the few reasons for the same.
However, the best part is that a human brain can be trained, just like the body. The strength of a human brain can be enhanced, and performing mudras are one of the best ways to do so. Hakini mudra is a very effective gesture which is referred to God in Hindu culture and is associated with 6th Chakra. It guides your consciousness through your 6th chakra, also called the third-eye or pineal eye. This mudra is also recommended for many memory training and management programs.
If your mind is at the right place, you can accomplish everything. That’s why the successful people more focus on getting their mindset right before anything else. So, check out the benefits as well as the correct procedure of doing the Hakini mudra:
Benefits:
It promotes a fine corporation between left and right hemisphere of the brain (left is associated with logical thinking and right with creativity).
Brain performance is at it best when both parts are used simultaneously as it helps to improve concentration.
This is also beneficial when you have to do lots of mental work or multitasking.
It develops calmness.
Hakini mudra encourages your brain efficiency and enhances your memory power.
It also expands the respiration, which in turn good for the brain as more oxygen is supplied to the brain.
It improves the clarity of thoughts and hence improve decision making.
This mudra is good for students because this will help them to concentrate better on their studies.
How To Do:
Step 1: Raise your hands and let them face each other without touching.
Step 2: Fold the fingers of both hands slightly inwards and let fingertips of both the hands touch each other.
Step 3: Ensure that your palms do not touch each other since the fingers tips will act as the only joining points for both hands.
Step 4: Focus your eye gaze on the third eye, i.e. at 6th chakra (at the center of the forehead).
Step 5: Inhale and let your tongue touch the roof of your mouth.
Step 6: Exhale and allow your tongue to relax.
Step 7: Take few deep breaths and let your mind to focus on the things you want to recall or analyze.
Thus, by placing the fingertips of both hands together, you connect the flow of energy between the two sides of your brain and body. Practice Hakini mudra for gaining memory strength and brain power for 45 min daily. Or practice it 3 times in a day for 15 minutes.
Yoga is a known stress buster, but it’s also one of the most effective workouts for fighting stubborn fat stores, especially the ones that crop up after age 40. . The reason: Studies show that yoga lowers levels of stress hormones and increases insulin sensitivity—a signal to your body to burn food as fuel rather than store it as fat. The following yoga poses for weight loss will do just that while firming up your arms, legs, butt, and abs. Start now to see weight loss results in as little as 3 weeks. (Cinch your waist and get toned all over with Prevention’s Flat Belly Yoga DVD.)
Workout at a Glance What you need: A yoga mat or carpeted space How to do it: Follow this routine at least 3 times a week, holding each move 1 time for 3 to 5 deep breaths, unless otherwise noted. Start with the Main Move for each exercise. If it’s too difficult, do the Make It Easier variation. If it’s not challenging enough, try the Make It Harder option. For faster results, hold each pose for 5 to 8 breaths and increase repetitions (where noted) by 2 or 3.
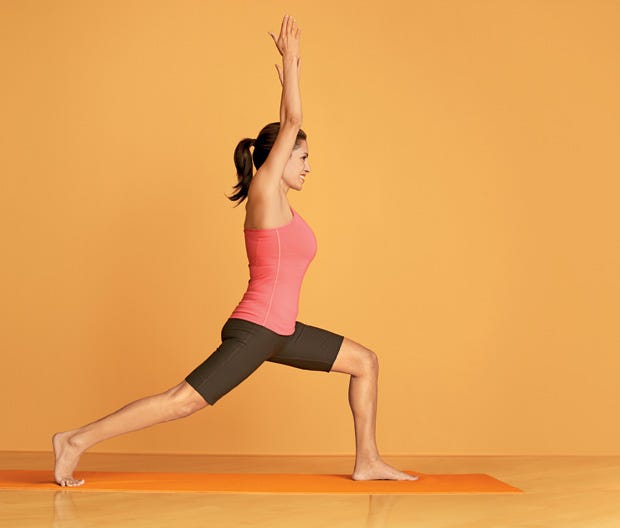
Crescent
(Firms abs, hips, and thighs)
David Martinez
Advertisement – Continue Reading Below
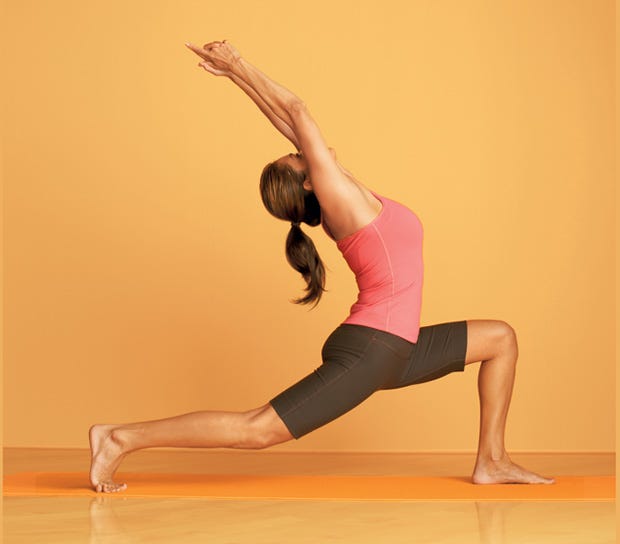
Stand with feet together, toes forward, and arms at sides. Inhale and raise arms overhead, reaching fingertips toward ceiling. Exhale, and bend forward from hips, bringing hands to floor (it’s OK to bend knees). Inhale, and as you exhale, step right leg back into a lunge (left knee bent about 90 degrees, knee over ankle; right leg extended and on ball of foot). Inhale and raise arms overhead; gaze forward. Hold, then return to standing and repeat, stepping left leg back. Make it harder:
David Martinez
From end position, inhale and arch torso, arms, and head backward, gazing at fingertips. Make it easier: Lower right knee to touch floor as you step back into a lunge, and rest hands on left thigh.
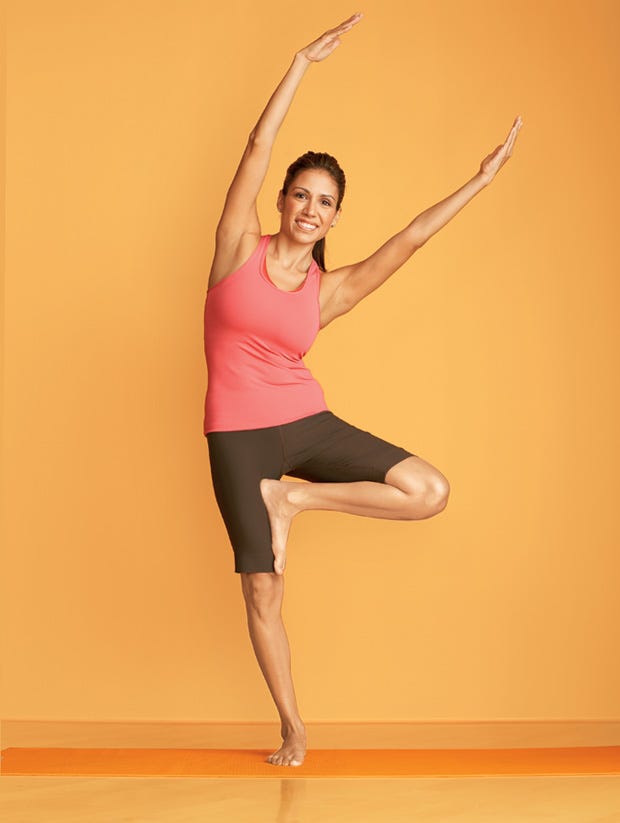
Willow
(Firms sides of abs)
David Martinez
Advertisement – Continue Reading Below
Stand with feet together, arms at sides. Place sole of left foot on inside of right thigh, knee bent to side. Touch palms in front of chest for 2 breaths. On third inhale, extend arms up, fingertips toward ceiling. Exhale, and bend torso to left. Inhale and straighten. Repeat 3 to 5 times, pressing foot into thigh; switch sides. Make it easier: Keep left foot on calf or touch toes to floor for balance. Make it harder: Close eyes as you balance and bend.
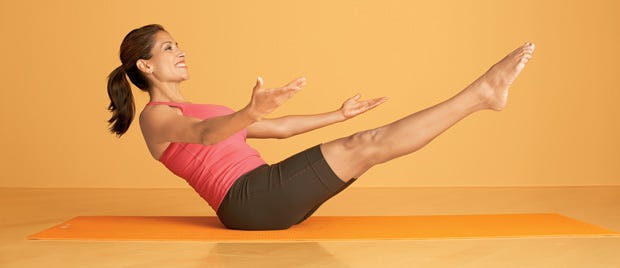
Rocking Boat
(Firms abs and back)
David Martinez
Sit with knees bent, feet on floor, hands on thighs. With torso straight and head in line with body, lean back about 45 degrees, raising feet so calves are parallel to floor, toes pointed. On an inhale, extend arms and legs, keeping legs together. Exhale, and as you inhale, lower torso and legs 3 to 4 inches so body forms a wider V shape. Exhale and raise torso and legs. Repeat 3 to 5 times. Make it easier: Hold backs of thighs with hands and keep legs bent. Lower torso only. Make it harder: Once in the wider V position, extend arms overhead.
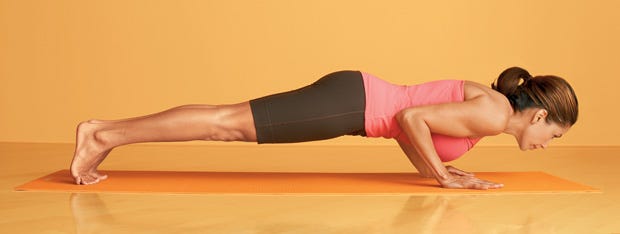
Hover
(Firms shoulders, arms, abs, and back)
David Martinez
Begin in push-up position on toes with arms straight, hands below shoulders, and body in line from head to heels. On an exhale, lower chest toward floor, bending elbows back, arms close to body, abs tight. Hold a few inches above floor. Make it easier: Begin on hands and knees and walk hands forward until body is in line from head to knees. Make it harder: While holding the hover, lift left leg 6 to 12 inches, pause, and lower. Do 3 to 5 times, then switch legs.
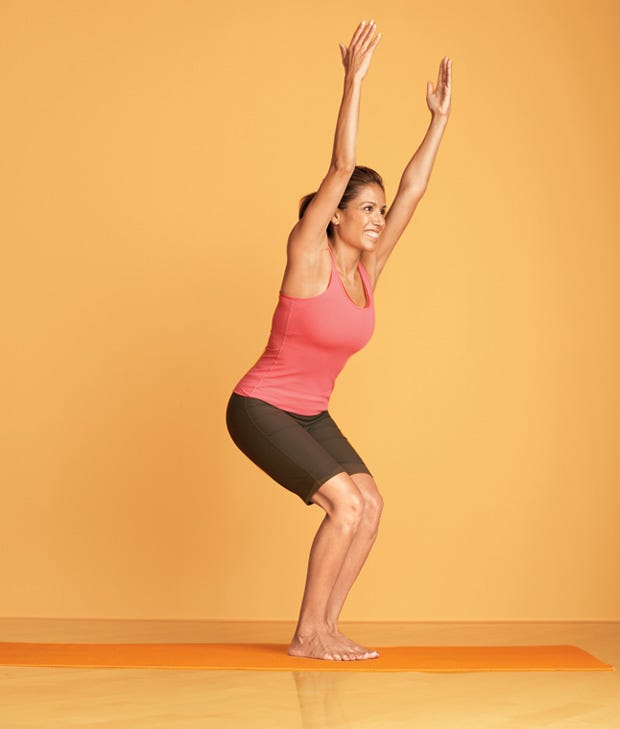
Chair
(Firms butt and thighs)
David Martinez Stand with feet together, toes forward, arms at sides. Inhale and raise arms overhead, palms facing each other. Exhale and sit back about 45 degrees, keeping knees behind toes and abs tight to support your back; gaze forward. Make it easier: Do the move with feet hip-distance apart, hands on thighs, and bend only about 30 degrees. Make it harder: After you sit back, lift heels off floor, balancing on balls of feet (knees will be in front of toes); gaze up at fingertips. marianne mcginnis Marianne McGinnis is a former Prevention associate editor.
Start in mountain pose, back to back, a few inches away from your partner. Inhale together raising your arms up to the sky, then on your exhale hinge at the hips and fold forward, lifting your sitting bones upward and resting your chest on your thighs. You can hold hands or elbows with your partner and definitely exchange upside down smiles. Stay here for a few breaths and come out of the pose with the same hinge at the hips, core engaged and a flat back.
2. Seated Twist (Ardha Matsyendrasana)
Begin in a cross-legged position seated with your backs resting against each other. On your inhale, reach your arms overhead, and exhale to twist to the right. While twisting you`ll bring your right hand to the inside of your partner’s left knee and your left hand to the outside of your right knee. Your partner will be mirroring you. You can stay in the twist for 5-7 breaths. Don`t forget to twist to both sides.
3.Seated Forward and Backbends (Paschimottanasana)
Begin in a cross-legged position seated with your backs resting against each other. One of you will fold forward and the other one will lay down comfortably on the back of the one who is folding forward. So take a big inhale, raise your arms up overhead, and on your exhale slowly fold forward, keeping your legs crossed. When you are ready to go deeper into the pose you can let your partner go ahead and lay down on your back. Your partner will stay cross-legged as well and just comfortably lay down on your back, letting her arms drop out to the side, beautifully opening her chest. Stay here for a few breaths then swap – now your partner will be folding forward and you’ll be bending backward.
4.L-Shaped Handstand (Adho Mukha Vrksasana)
In this pose, you’re both going to create an L-shape with your bodies. One of you will sit down in Staff Pose (Dandasana) and the other one will come into a supported tuck handstand. The easiest way to get into this pose is if the one in Staff pose helps to lift the leg of the one in a handstand. In both poses keep your core engaged, shoulders are strong but kept away from the ears and the most important part is to smile at each other. To come out of the pose, lower the legs of the one in a handstand, then rest in Child Pose (Balasana) for a few breaths.
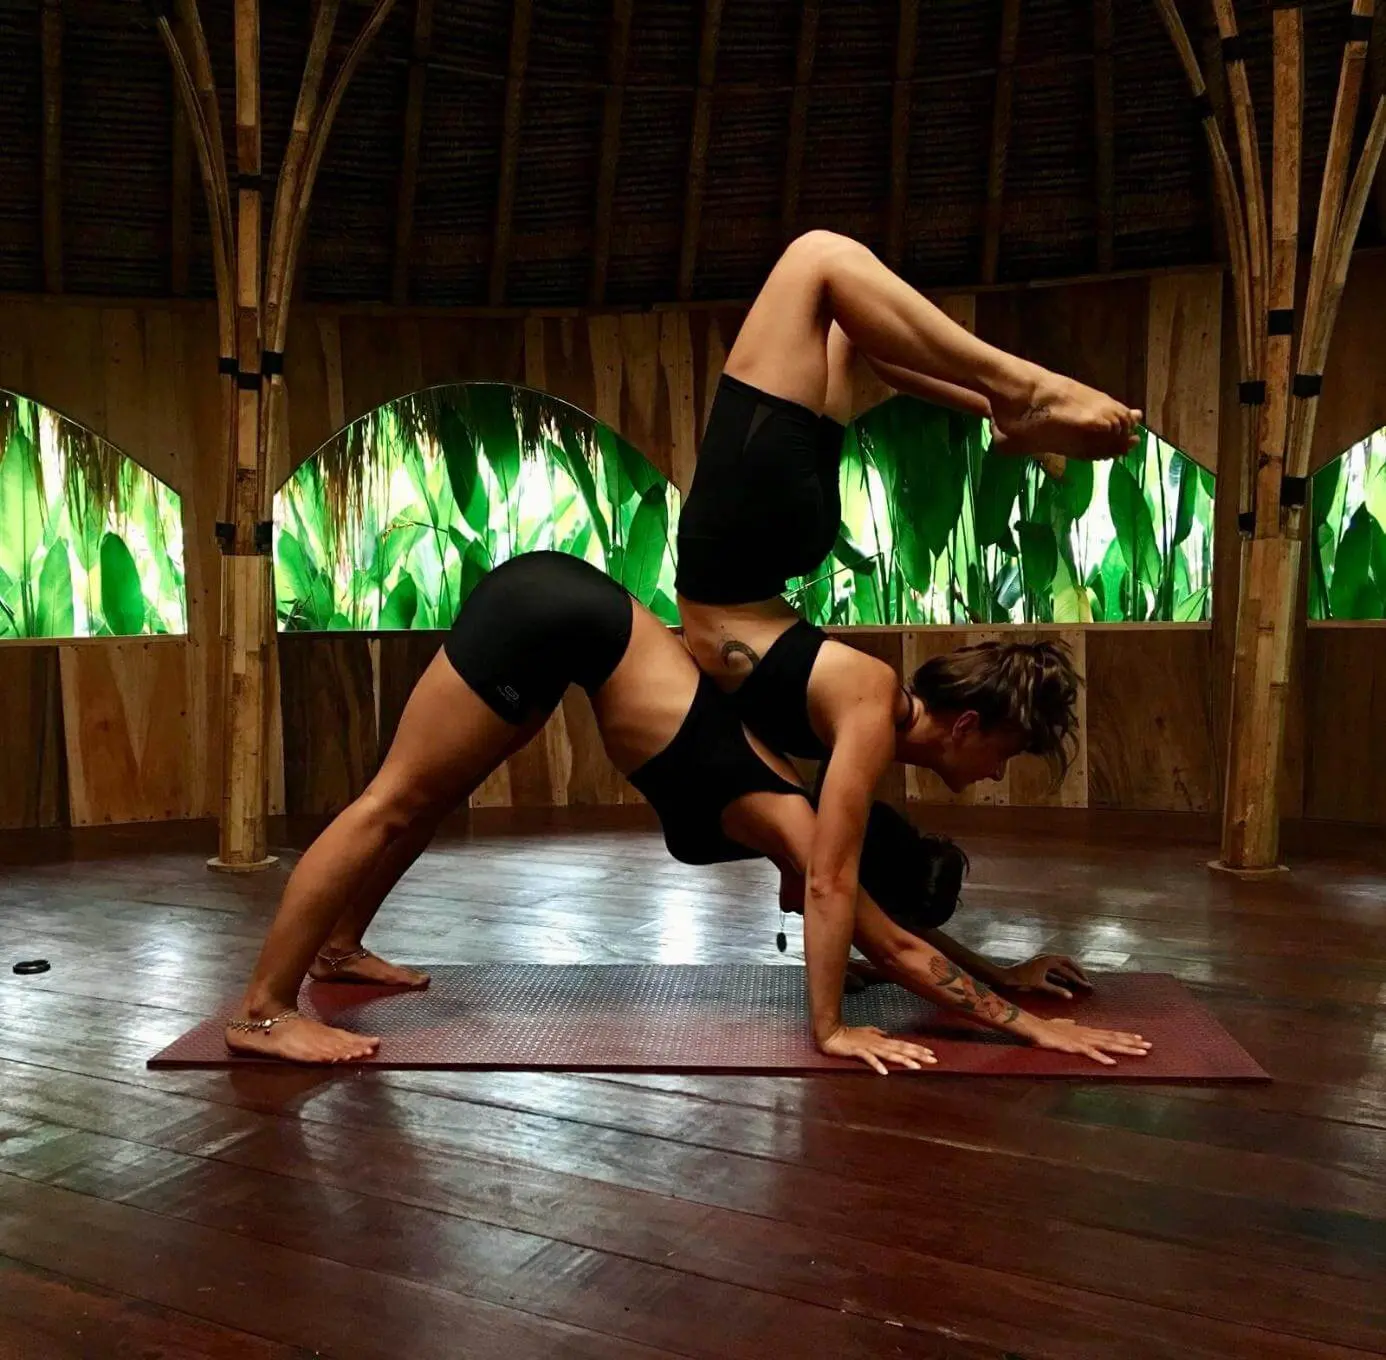
5. Downward-Facing Dog (Adho Mukha Svanasana)
Start in a Downward-Facing Dog position, one in front of the other. The one in front of the other will walk her feet and hands back until she is able to step her feet up to the back of the partner’s hips and coming to a stable and comfortable position. You can hold the pose for five to seven breaths. To come out, the one in down dog should wait for the partner to walk forward with her hands and gently step off her back. Take child’s pose for a few breaths before swapping.
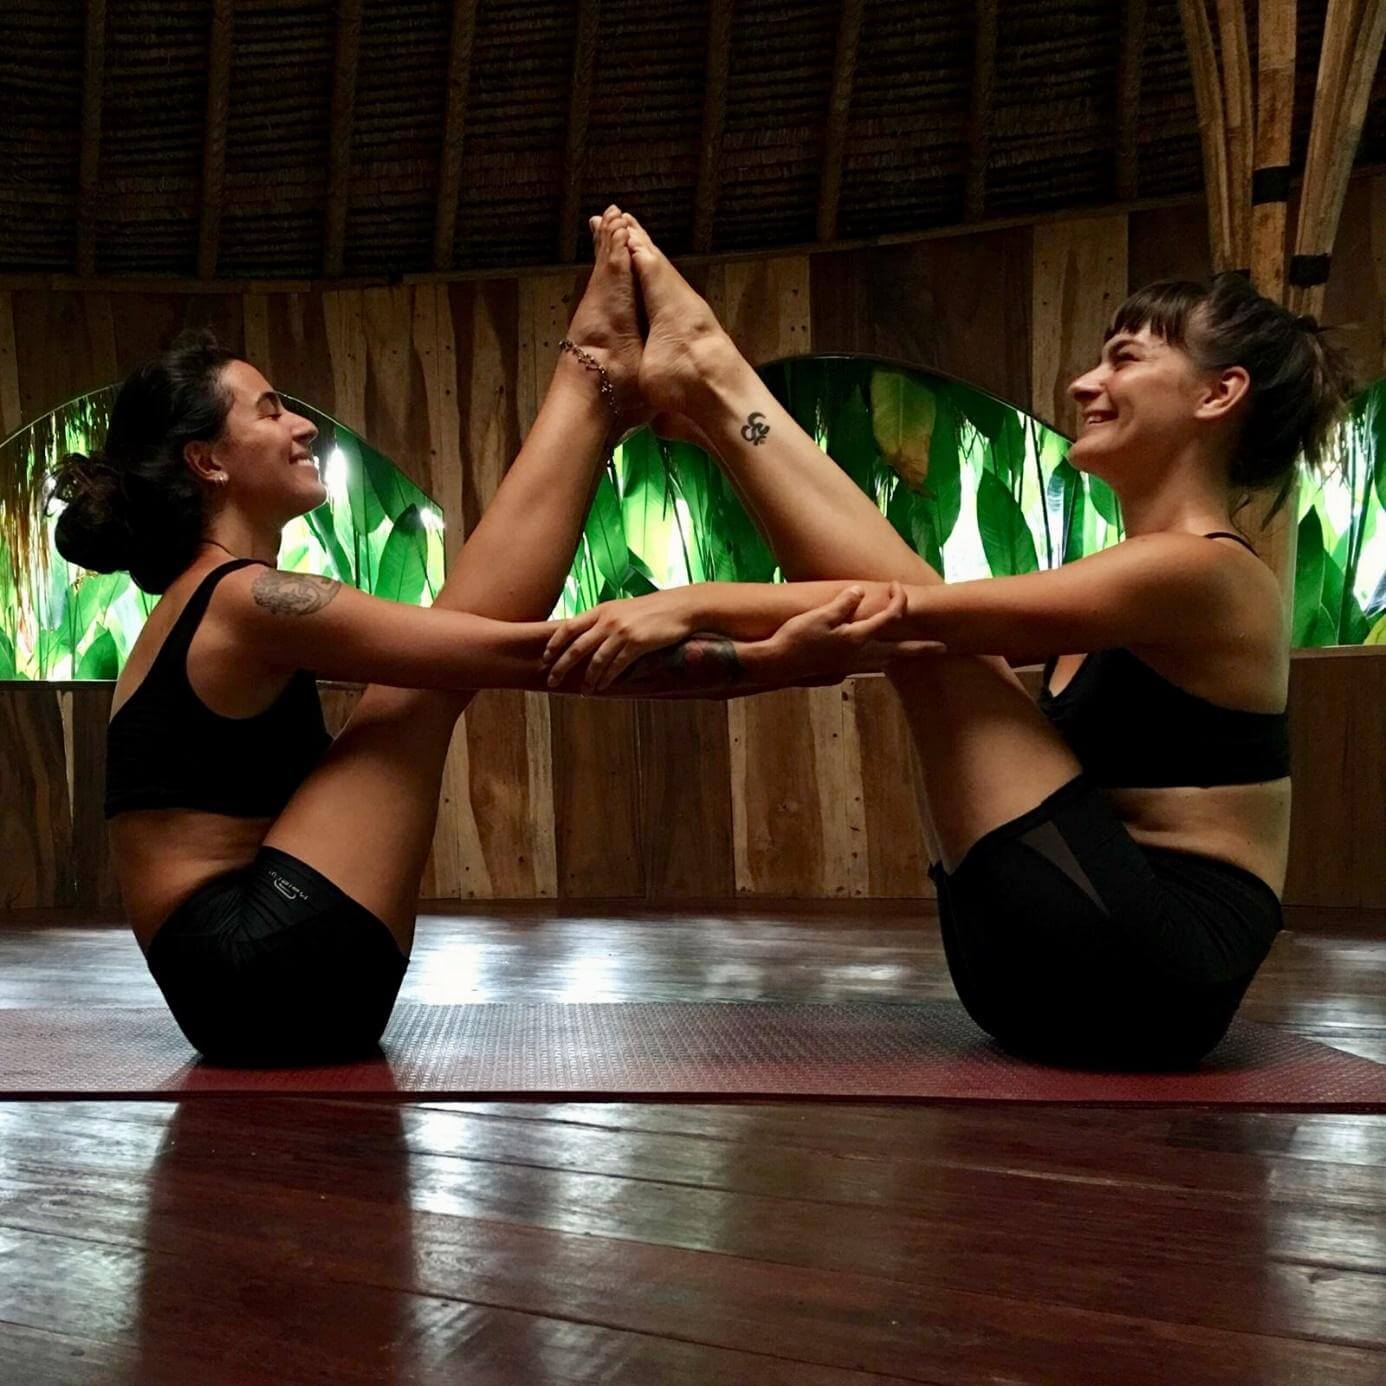
6. Boat Pose (Paripurna Navasana)
Sit facing each other with your knees bent and toes touching. Reach for your partner’s wrists. While holding each other, walk the soles of your feet together, drawing your knees towards the chest. Keeping the spine straight and chest open, begin to straighten the legs. When your legs are straight, hold for five to seven breaths, then come out the way you went in the pose. This is definitely a challenging pose and requires a lot of openness in the hip flexors and hamstrings so don’t worry if you can’t extend your legs, just play around, listen to your body, and enjoy the process.
7. The Dog and the Warrior
This is a super fun partner pose to try but it’s also challenging, so approach it with playfulness. One of you will start in downward dog and come into a three legged dog. The other one will stand in front and come into a reverse warrior pose. To help you both get in deeper to the stretch, you’ll reach for each other. The reverse warrior will gently pull on the three legged dog’s lifted leg for a deeper hip opening and the leg will pull on the warrior’s arm for a deeper stretch of the side body. Win-win, isn’t it? Don’t forget to do both sides and you can swap as well. To come out of the pose, the one in reverse warrior pose will let go of the foot and come into Warrior 2. You can both rest in Child Pose for a few breaths after performing this pose.
8. Hollowback
This pose is definitely one of those that looks much harder than what it actually feels like. One of you should face away from the other one who will gently come up into handstand – this way you’re facing away from each other. At the same time, both should slowly start making a hollow back shape with your backs, with the standing partner reaching for the feet of the one in a handstand. Make sure you keep communicating through every movement to avoid getting out of balance.
9. Crow on Pigeon (Bakāsana on Eka Pada Rajakapotasana)
This is quite an advanced variation so try this pose if one of you has a solid arm balance practice and the other one can go deep into Sleeping Pigeon pose. I cannot put enough emphasis on the importance of warming up – do put this on the list of poses to try after taking a class or doing a long warm up! What’s challenging about this pose for the one in Crow is to balance on a wobbly surface and to be able to lift the knees as high towards the armpit as possible – with the hands on a raised platform. Super fun to play around with, but definitely approach this one with a sense of humour.
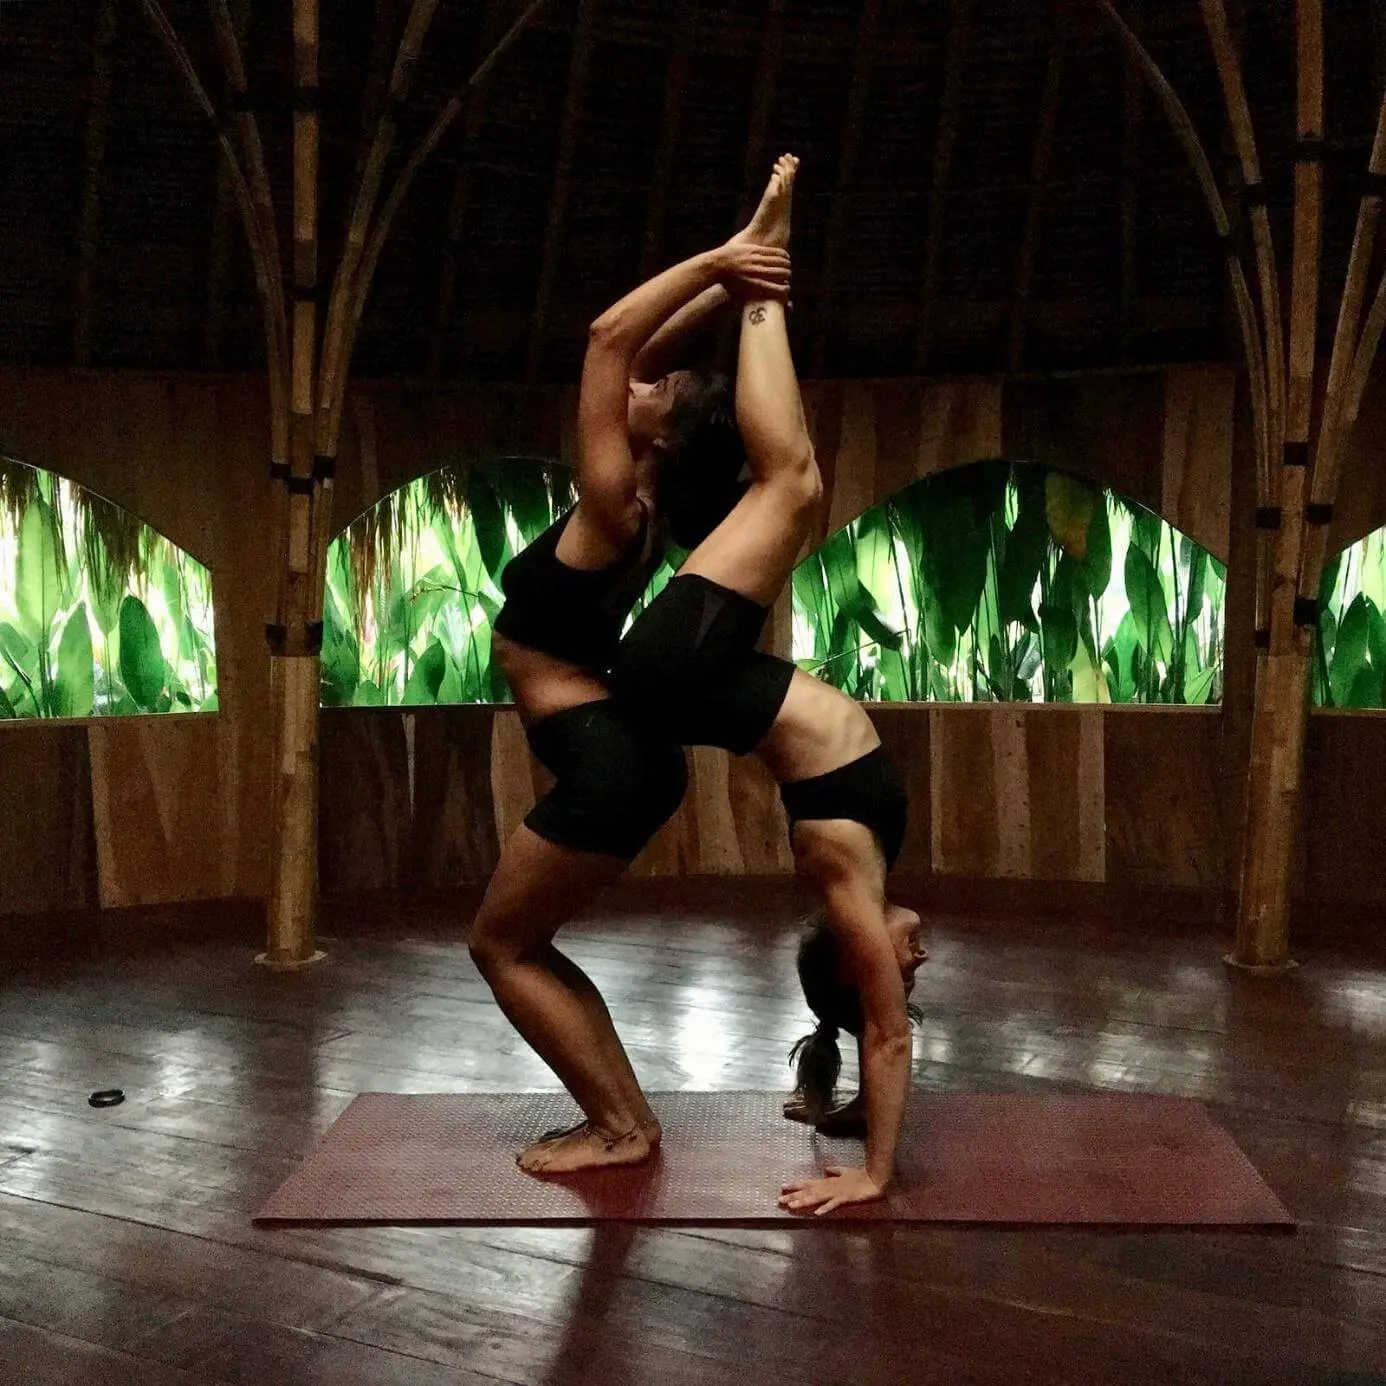
10. Supported Scorpion Pose (Vrishchikasana)
If you are working on your handstands and/or your scorpion pose, you’ll love this one. It is the perfect balance between being challenged yet supported. Your partner will be in down dog and you’ll have your hands behind hers – with your body on her back. Slowly start lifting your legs and bending them behind you. You will feel supported by her back but you’ll be challenged to hold your body’s weight on your arms and go deeper into this deep backbend. Try to come out as gracefully as you went in, share some laughs and rest in Child Pose.https://bookretreats.com/blog/yoga-poses-for-two-people/
This is a balance pose that helps you and your partner improve focus and at the same time being a moderate hip opener.
Here’s how to do it:
Begin by standing next to each other, but a few feet apart while you are facing the same direction.
Then, bring your palms towards each other so your arms will form a “T” shape. This means you are drawing your palms and elbows together in a shape of a cactus.
Now, start shifting your weight onto your right foot and let your partner shift her weight onto her left foot.
Draw your opposite leg into a tree pose. You can do this bending your knee and bringing your foot to the inner thigh, calf, or ankle of the standing leg.
Keep your balance for at least 5 to 7 breaths before you release and turn around facing the opposite direction and start repeating the pose on your opposite side.
2. The Partner Forward-Fold
This pose just feels so good as it opens your hamstrings and calms the nervous system.
Here’s how to do it:
Start with a seated position and then face each other. Now extend your legs out to form a wide shape of “V”. Your kneecaps should be facing straight up while the soles of your feet should touch.
Now, extend your arms toward each other and hold the opposite palm to the forearm.
Breathe in as you lengthen up through your spine
Breathe out as you forward from your hips while your partner is sitting back, keeping her arms and spine straight
While you are relaxing into this pose, let yourself soften into it. Stay in this pose for about 5 to 7 breaths
Come out of this pose by releasing each other’s arms and bringing your torsos upright. You can do this again in the opposite direction, this time bring your partner into the Forward Fold pose.
3. The Partner Twist
This pose is an effective way to cleanse your body and also help in the detoxifying process. This pose is an enjoyable way to initiate playfulness with your partner.
Here’s how to do it:
You can start in a seated position with your legs crossed and your backs are resting against each other
Breathe in as you reach your arms overhead
Breathe out and start twisting your body to the right, bring your right hand to the inside of your partner’s left knee while your left hand to the outside of your right thigh or knee. Your partner should do the same movement.
Hold this position for about 3 to 5 breaths and then do it again on your opposite side.
4. The Buddy Boat
If you and your partner are both energetic, you will love this yoga pose. It is actually very playful that it encourages laughter, but the best thing is that it will gently work your core.
Here’s how to do it:
Look for a seating position that you find comfortable. Face each other while your knees bent and your toes touching. Then start reaching for your partner’s wrist.
Now, start walking your soles of feet together then draw your knees into your chest.
Make sure that you are keeping your spine straight while your chest opens then start to straighten your legs. I know this can be challenging but just try to stay playful as you are straightening your leg one at a time.
Hold this position for about 5 to 7 breaths.
5. The Back-to-Back Chair
This yoga pose is not only a brilliant, exciting bonding but it is also a good way to strengthen your quads and improve your posture.
Here’s how to do it:
Stand with your backs touching while your elbows are linked. Try to feel and keep up with the breath of your partner.
Then, press against each other’s back as you walk your feet forward. Make sure you keep your lower back as well as spine touching your partner’s as you try to go down for a sitting position (take note that this should not be lower than 90 degrees).
Hold this pose for at least 2 to 3 breaths then gradually go back to standing by carefully rising. If you want some added strengthening challenge, try to lower yourself repeatedly.
Final Thought
If you are looking for the best way to heighten your individual yoga practice, and at the same time take your relationship with someone else into another level, you should consider these partner yoga poses.
This is a really great way to improve and cultivate both physical and emotional support in a relationship. It’s also an opportunity to be open and develop full faith in each other. What are you waiting for? Grab a friend or a loved one and roll out your mats. See what happens!