
The 4 Basic Elements to Building a Green Home
Green building is more than the actual construction of your home, though that is a big part of the process. It is a beginning to end process which begins with the selection of your land, the design of your dream home, the materials and practices used during construction and finally, how you operate and maintain your dream home once it is completed. You can incorporate as many or as few of these elements into your home’s design as you choose.
You decide how “Green” you want to be.
Let’s look at the four basic elements in Green Building:
1. Increasing energy efficiency
2. Materials selected for building your home
3. Increasing the efficiency of water usage both in and outside of your home
4. Improving air quality, which improves the health and productivity of your family
There are many parts to each element. Let’s look at each of these in a little more detail
1. Increasing Energy Efficiency
* Advanced Framing – Use a framing contractor who can apply advanced framing technique during the construction of your home. This creates a structurally sound home with improved energy efficiency, and lowers material and labor costs. This technique replaces lumber with insulation material and maximizes the wall that is insulated, improving the R-value of the home. On average, advanced framing uses 30% less lumber, which reduces the building costs and saves 2% to 4% of the total energy use.
* Hot Water Heater – Water heating can account for 14% to 25% of the energy consumed in your home. To increase the efficiency of your hot water heater, locate it near the highest point of usage. This is typically near the shower followed closely by the clothes washer.
* Pipes – Insulate the hot and cold water pipes within 3 feet of the hot water heater. This reduces standby heat loss. Your hot water heater is continuously heating the piping and water in it, even when no water is being used.
* Household Appliances – A green built home features appliances that are as energy efficient as possible. The U. S. Department of Energy and the U.S. Environmental Protection Agency have developed a program called Energy Star which labels those appliances meeting strict energy efficient criteria. The typical household spends $1,900 a year on energy bills. As you can see in the diagram above, a great deal of that energy is consumed by the appliances in your home.
o ENERGY STAR qualified appliances incorporate advanced technologies that use 10-50% less energy and water than standard models. Just look for the Energy Star label. The Federal Trade Commission requires that refrigerators, freezers, water heaters, washing machines, dishwashers and window air conditioners be labeled with an Energy Guide Label.
o The label for a hot water heater is shown here. This hot water heater uses 268 therms per year of energy and is being compared to other similar models which use anywhere from 238 to 273 therms per year. This model’s estimated yearly operating cost is $162.When comparing different appliance brands for your new home, be sure to look at their estimated energy consumption. This will impact the operating cost of your home for years to come.
* Air Sealing – This is advanced caulking which is a part of the airtight drywall approach (ADA). Specifically, caulk or gasket drywall is installed on exterior walls at the top and bottom plates, windows and door frames; on interior walls at the intersections with exterior ceilings; and at electrical, plumbing or mechanical penetrations in the drywall. This approach minimizes heat loss in your home. Work with your drywall contractor to see if he/she uses this method.
* Radiant Barrier – Reflect heat away from your home by installing a radiant barrier (a sheet of aluminum foil with paper backing) on the underside of your roof. This significantly lowers your cooling costs by reducing your heat gains through your ceiling by 95%.
* Insulation – Add insulation to your attic to keep the heat in your house. There are some environmentally friendly insulation products made from recycled blue jeans, soybeans, cotton or newspapers.
* Solar Power – If the sun shines on your home for most of the day in the winter, you have the potential for solar power to reduce your energy costs. A good solar design allows the winter sun to reach a thermal mass like a tile floor which holds heat and radiates it into your home for a period of time.
* Lighting – Install high-efficiency lighting systems with advanced lighting controls. This allows you to only use the light when you need it. Replace traditional incandescent lights with energy-efficient compact fluorescent bulbs. These bulbs will use 75% less electricity and last up to 10 times longer. When designing your home or remodeling project, introduce natural daylight into as many places as possible.
* Thermostat – Use a programmable thermostat to provide you and your family the comfort you want day and night while minimizing heating use when you don’t need it.
* Ducts – Seal your ducts with mastic and insulate them to R-11. This minimizes the heat loss from your home.
* Paints – You can mix non-toxic ceramic powder into your interior paint to insulate your walls and reduce the amount of heat passing through to the outside. These ceramic particles create a radiant barrier that reflects the heat back into the room.
* Redirect The Heat – If you have a ceiling fan, redirect the heat back into your room by reversing the direction of the blades to counterclockwise. This brings the heat back down into your room.
2. Materials Selected for Building Your Home
* Plastic Lumber – This product can be used for non-structural applications such as fences, benches, decks, retaining walls, and picnic tables. It is weather and insect resistant, and will not crack, splinter or chip. It does not need painting and will not leach chemicals into the ground or surface water. By doing this, you minimize the amount of lumber used in your home, reduce your ongoing maintenance costs, and you won’t harm your local habitat.
The US is home to 4.5% of the population but is responsible for over 15% of the world’s wood consumption.
* Engineered Wood – This combines the raw materials of wood veneer and fiber with adhesives to produce such laminated lumber as wood veneers, I-beams and roof and floor trusses. The manufacturing process uses fast growing, small diameter trees, allowing more than 80% of the log to be used in the end product. This produces a product which is very consistent and stable while decreasing the impact on a natural resource.
* Fiber Cement Siding – This is a composite of cement and wood fiber reclaimed from wood processing waste or small diameter, fast growing trees. It produces a siding which is durable and low maintenance. Many fiber-cement composites offer a 50-year warranty, which increases the value of your home and decreases the maintenance costs.
* Brick -The process of extracting clay for brick results in limited wasted material. Brick has a limitless lifespan and can be recycled or salvaged after demolition.
* Recycling – The efficient use of materials when building Green comes in two forms. First, recycle construction waste and use reclaimed building materials during construction when appropriate. Once your home is finished, practice responsible recycling of the materials you use every day.
* Design – When working with your architect or designer, use standard dimensions, engineered wood and stacked floor plans to reduce the overall volume of lumber used as well as the volume of waste.
3. Increasing the Efficiency of Water Usage Both In and Outside of Your Home
* Porous Paving Schemes – Watertight, or “impervious,” surfaces suchas paved driveways, walkways and patios don’t allow storm water runoff to infiltrate into the ground’s aquatic systems. Using uncompacted gravel, crushed stone and open or porous paving blocks for walkways and other light traffic areas minimizes the number of impervious surfaces on your property, allowing storm water runoff.
* Rainwater Collection – Rainwater collected from your roof is a free source of landscape irrigation water. This collection system consists of a suitable roof and guttering system, a storage tank and a simple filtration unit.
* Low Impact Development (LID) – This innovative approach mimics your land’s original method of water run-off instead of disposing and treating storm water in large, costly, end-of-pipe facilities. This can come in the form of open spaces, vegetated rooftops, reduced street widths and curbs, pervious parking lots and sidewalks, medians and other buffer zones using more vegetation.
* Plumbing – Design your home to use recycled water for toilet flushing. Use ultra low-flush toilets and low-flow shower heads.
Some older toilets use 3-7 gallons per flush while an ultra low-flow toilet uses less than 1.6 gallons per flush.
A family of 4, each showering for 5 minutes per day will use 700 gallons of water per week – a 3 year drinking supply for 1 person in the US. Using a high performance shower head uses 1 – 1.5 gallons of water per minute – up to 60% less than a traditional shower head.
* In Your Yard – Mulch exposed soils in your garden beds and improve that soil with compost to a depth of 8-13 inches to increase the ability to hold water. Select plants that have low water and pesticide needs. Planting trees not only beautifies your yard, but will also increase the value of your home while decreasing your impact on the environment. A single mature tree can provide nearly $300 in energy and resource values in terms of cooling, erosion and pollution control. Plus they reduce your “carbon foot print.”
Putting the right plants in the right place and developing quality, healthy soil means less watering in the summer, less need for chemicals and less waste to worry about.
* Chemicals – Avoid outdoor chemicals and fix oil and other fluid leaks to prevent contamination of the water runoff.
According to the NY State Attorney General’s office, 95% of pesticides used on residential lawns are considered possible carcinogens by the EPA.
* Hot water – Use recirculating systems for centralized hot water distribution or utilize “on demand” systems vs. traditional hot water tanks.
4. Improving Air Quality, Which Improves the Health and Productivity of Your Family
The EPA ranks indoor pollution among the top 5 environmental risks. Unhealthy air is found in up to 30% of new and renovated buildings. The electricity generated by fossil fuels for a single home puts more carbon dioxide into the atmosphere than 2 average cars.
* Carpet – Using a low pile or less allergen attracting carpet and pad greatly improves air quality. Wool or PET carpet (made from recycled pop bottles) are good choices. In addition, at installation, have the carpet tacked down, not glued, to reduce pollutants. Many Green Built designs minimize the use of carpeted surfaces, replacing them with hard surfaces which don’t have these pollutants and are easier to keep free of dust, mold and mildew.
* Paints – Use low-VOC (Volatile Organic Compounds, such as formaldehyde) paints.
* Ventilation – While you want to seal your home to prevent heat loss, this creates a need for mechanical ventilation. Ventilation can be provided by quiet fans with automatic controls or by heat recovery ventilators. Talk to your HVAC contractor for the best system for your home’s design.
* Construction materials – To prevent microbial contamination, select materials that are resistant to microbial growth.
* Drainage – Provide effective drainage from the roof and surrounding landscape, as well as allow proper drainage of air conditioning coils.
* Window treatments – Avoid synthetic window coverings or those that cannot be cleaned easily.
Even though there is a lot to think about when using Green Building techniques and principles, it is manageable and doable. We here at UBuildIt can help you work with your architect or designer, subcontractors and suppliers to help you build or remodel your dream home while minimizing your impact on the environment. Taking the time to plan and build or remodel your dream home using UBuildIt and Green Building will positively impact you and generations to come.
Chuck Warrender, an experienced custom builder, opened UBuildIt in 1988 to show people how to become Owner-builders and save money or gain equity on their own custom home building and remodeling projects. Chuck designed the UBuildIt System for Owner-builders who want to build more homes for their money by directing their own construction projects. UBuildIt’s Construction Consultants guide Owner-builders every step of the way and provide a proven system, professional advice, and trusted resources. UBuildIt now has over 100 franchises across the US. Learn more about Chuck and how to build or remodel your own custom home at UBuildIt.com
http://www.howtofixyourstuff.com/homeoutdoors/the_4_basic_elements_to_building_a_green_home.php
Category: Points of interest

Amazing Animals!
Axolotl

The axolotl or “Mexican salamander” (who looks like a Pokémon , if you ask me) is often spotted in lakes in various places around Mexico. These little salamanders are amphibious although often spend their adult lives strictly in the water. However, the population of these cute creatures is dwindling due to non-native predators and the continued urbanization of Mexico. The axolotl eats small worms, insects, and fish in order to survive.

Healing Hand Cream~DIY
Healing Hand Cream with Jojoba Oil
Recipe by:
Jennafer Ashley
Heal dry, cracked hands with this homemade hand cream made with just three natural ingredients.
Tools
- Double boiler
- 6 oz jar
Ingredients
- 1/2 cup shea butter
- 2 t jojoba oil
- 5 drops lavender essential oil
Instructions
- To Make: Melt the shea butter in a double boiler over medium heat until it liquifies, about 7 minutes. Let it cool in the refrigerator for 15 minutes, then remove. The mixture should be opaque in color.
- Whisk the shea butter vigorously for 5 minutes, until thick and fluffy. When ready, add in the jojoba oil and essential oil to thoroughly combine.
- Transfer the mixture to a 6-ounce jar and store in a cool, dry spot.
- To Use: Scoop out ½ teaspoon of lotion and massage into hands or heels of your feet. Apply at night, right before bed, for best results.


DIY~ Muscle Relief Bath Bomb

Muscle Relief Bath Bomb Recipe
Tools
- Spray bottle filled with water
- Medium glass bowl
- 2 Metal bath bomb molds
Ingredients
- 1/2 cup baking soda
- 1/3 cup Epsom salts
- 2 T cream of tartar
- 2 T coconut oil, melted
- 1 t peppermint oil
- 1/2 t fresh rosemary, chopped (optional)
Instructions
- Start by combining dry ingredients and chopped rosemary in a medium glass bowl. Whisk to blend. Whisk in coconut oil and peppermint oil.
- Using a spray bottle, spritz water to moisten mixture as you stir. The mixture should be crumbly, but hold when squeezed.
- Use a spoon to scoop mixture into bomb molds or ice cube trays. Press firmly. If using a bomb mold, overfill each side slightly before putting together. Allow to set at least 4 hours in a cool, dry area.
- Loosen bombs from molds and place in warm bath water to dissolve.

Feel Fabulous Friday
6 Restorative Yoga Poses for Adrenal Fatigue
Our yoga sequence for adrenal fatigue will help you to unwind, de-stress, and reset your adrenal glands. You will need a blanket, a long pillow, and two yoga blocks.
Viparita Karani | Hold 5 minutes

This relaxing pose reverses blood flow out of the legs and brings blood and lymph fluid back towards the abdomen up to the brain, helping to energize and awaken the circulatory system.
- Begin with a block off to one side and sit next to the wall with your legs parallel to the wall. Roll back and slide your legs up the wall.
- Bend your knees and press your feet into the wall to lift your hips. Slide the block underneath your sacrum.
- Extend your legs straight up the wall. Spread your arms out wide by your sides with your palms facing up. Close your eyes and find a natural breath. Allow the muscles of your face to relax, and hold for 5 minutes.
Supported Child’s Pose | Hold 5 minutes

This pose helps to foster feelings of safety and security to help you into a deep relaxation.
- Begin with a long pillow off to one side. Kneel down with your knees out wide to the edges of your mat. Bring your big toes to touch and sit your hips back onto your heels.
- Place the long pillow vertically up and down the mat with one end between your thighs.
- Place your hands down to frame the pillow. Walk your hands forward to lower your chest onto the pillow. Place one cheek down and close your eyes. Hold for 5 minutes, switching to the other cheek halfway through.
Basic Relaxation Pose | Hold 5 minutes

This pose allows you to completely relax, helping to reduce stress and fatigue.
- Take a blanket and fold it into a rectangle. Roll up one end 3/4ths of the way. Place the blanket towards the top of your mat, with the rolled up part at the bottom.
- Place your two blocks halfway down your mat.
- Lie down so that the rolled up part of the blanket rests underneath your neck and the unrolled part is supporting your head. Adjust the blocks so that they support your knees. Extend your arms out wide to the sides with your palms facing up. Close your eyes and allow yourself to fully relax here for 5 minutes.
Supported Crossed-Legs Pose | Hold 2 minutes per side

This relaxing pose helps to relieve tension in the hips and increase a sense of ease in the body and mind.
- To begin, place a chair on your mat. Sit in front of the chair with your legs crossed, facing the seat.
- Bring your arms onto the seat and gently rest your forehead down.
- Close your eyes and hold for 2 minutes. Cross the other leg in front, rest your forehead back down, and relax for 2 more minutes.
Supported Bridge | Hold 5 minutes

This pose helps to slow the overactive sympathetic response and bring your body back into balance.
- Start with your long pillow or a block off to one side. Lie down on your mat with your knees bent and your feet on the floor.
- Lift your hips up towards the ceiling into a bridge. Slide the pillow or block underneath your sacrum. Lower your hips back down onto it.
- Extend your legs down the mat. Release your arms out by your sides with your palms facing up. Close your eyes and relax here for 5 minutes.
Supported Twist | Hold 2 minutes per side

This pose helps to stretch the muscles of the back, increase digestion, and relieve mental tension.
- To begin, place your long pillow vertically up and down your mat.
- Sit in front of the pillow facing sideways, with your right hip next the pillow. Bend your knees so that they are pointing to the right.
- Twist your torso to face the pillow and place your hands down to frame it. Walk your hands towards the top of the mat to bring your torso to rest on the pillow. Rest your right cheek down and close your eyes. Hold for 2 minutes and then switch sides.
Tips:
- If it feels uncomfortable in your neck, place a blanket under your cheek.
- If you want to feel a deeper twist, turn to the opposite cheek.

Short Story Share
A Telephonic Conversation
by Mark Twain

Consider that a conversation by telephone–when you are simply sitting by and not taking any part in that conversation–is one of the solemnest curiosities of modern life. Yesterday I was writing a deep article on a sublime philosophical subject while such a conversation was going on in the room. I notice that one can always write best when somebody is talking through a telephone close by. Well, the thing began in this way. A member of our household came in and asked me to have our house put into communication with Mr. Bagley’s downtown. I have observed, in many cities, that the sex always shrink from calling up the central office themselves. I don’t know why, but they do. So I touched the bell, and this talk ensued:
CENTRAL OFFICE. (gruffy.) Hello!
I. Is it the Central Office?
C. O. Of course it is. What do you want?
I. Will you switch me on to the Bagleys, please?
C. O. All right. Just keep your ear to the telephone.
Then I heard k-look, k-look, k’look–klook-klook-klook-look-look! then a horrible “gritting” of teeth, and finally a piping female voice: Y-e-s? (rising inflection.) Did you wish to speak to me?
Without answering, I handed the telephone to the applicant, and sat down. Then followed that queerest of all the queer things in this world– a conversation with only one end of it. You hear questions asked; you don’t hear the answer. You hear invitations given; you hear no thanks in return. You have listening pauses of dead silence, followed by apparently irrelevant and unjustifiable exclamations of glad surprise or sorrow or dismay. You can’t make head or tail of the talk, because you never hear anything that the person at the other end of the wire says. Well, I heard the following remarkable series of observations, all from the one tongue, and all shouted– for you can’t ever persuade the sex to speak gently into a telephone:
Yes? Why, how did that happen?
Pause.
What did you say?
Pause.
Oh no, I don’t think it was.
Pause.
No! Oh no, I didn’t mean that. I meant, put it in while it is still boiling–or just before it comes to a boil.
Pause.
What?
Pause.
I turned it over with a backstitch on the selvage edge.
Pause.
Yes, I like that way, too; but I think it’s better to baste it on with Valenciennes or bombazine, or something of that sort. It gives it such an air–and attracts so much noise.
Pause.
It’s forty-ninth Deuteronomy, sixty-forth to ninety-seventh inclusive. I think we ought all to read it often.
Pause.
Perhaps so; I generally use a hair pin.
Pause.
What did you say? (aside.) Children, do be quiet!
Pause
Oh! B flat! Dear me, I thought you said it was the cat!
Pause.
Since when?
Pause.
Why, I never heard of it.
Pause.
You astound me! It seems utterly impossible!
Pause.
Who did?
Pause.
Good-ness gracious!
Pause.
Well, what is this world coming to? Was it right in church?
Pause.
And was her mother there?
Pause.
Why, Mrs. Bagley, I should have died of humiliation! What did they do?
Long pause.
I can’t be perfectly sure, because I haven’t the notes by me; but I think it goes something like this: te-rolly-loll-loll, loll lolly-loll-loll, O tolly-loll-loll-lee-ly-li-I-do! And then repeat, you know.
Pause.
Yes, I think it is very sweet–and very solemn and impressive, if you get the andantino and the pianissimo right.
Pause.
Oh, gum-drops, gum-drops! But I never allow them to eat striped candy. And of course they can’t, till they get their teeth, anyway.
Pause.
What?
Pause.
Oh, not in the least–go right on. He’s here writing–it doesn’t bother him.
Pause.
Very well, I’ll come if I can. (aside.) Dear me, how it does tire a person’s arm to hold this thing up so long! I wish she’d–
Pause.
Oh no, not at all; I like to talk–but I’m afraid I’m keeping you from your affairs.
Pause.
Visitors?
Pause.
No, we never use butter on them.
Pause.
Yes, that is a very good way; but all the cook-books say they are very unhealthy when they are out of season. And he doesn’t like them, anyway–especially canned.
Pause.
Oh, I think that is too high for them; we have never paid over fifty cents a bunch.
Pause.
Must you go? Well, good-by.
Pause.
Yes, I think so. Good-by.
Pause.
Four o’clock, then–I’ll be ready. Good-by.
Pause.
Thank you ever so much. Good-by.
Pause.
Oh, not at all!–just as fresh–which? Oh, I’m glad to hear you say that. Good-by.
(Hangs up the telephone and says, “Oh, it does tire a person’s arm so!”)
A man delivers a single brutal “Good-by,” and that is the end of it. Not so with the gentle sex–I say it in their praise; they cannot abide abruptness.

Do Your Hands Tingle Or Go Numb? Learn More
Cardiovascular
The following cardiovascular conditions may cause numbness in the hands.
1. Heart attack

If a person is experiencing a suspected heart attack, they or someone near them should seek emergency medical help.
Severe blockages in the heart’s main blood supply can cause chest pain as well as tingling and numbness down one arm or the other.
Symptoms
Other symptoms may include:
- nausea
- sweating
- shortness of breath
- dizziness
- tingling and numbness down either side of the body
- shoulder pain
- unexplained fatigue
Treatment
Treatment includes admission to a cardiac catheterization laboratory in a hospital, where a specialist can diagnose and possibly reopen the blocked cardiac artery.
Learn more about heart attack here.
2. Stroke
An interruption in the blood flow to the brain — potentially from a traveling blood clot or a ruptured artery causing a brain bleed — can lead to stroke.
Symptoms
Symptoms may include:
- sudden weakness or numbness on one side of the body
- confusion
- lower facial drooping on one side of the face
- difficulty maintaining balance
- visual problems
- speech problems
Treatment
If a person is experiencing a suspected stroke, they or someone near them should seek emergency medical attention, which may involve the administration of clot-busting medications.
Vascular
The following vascular conditions may cause numbness in the hands.
3. Vasculitis
Vasculitis can occur when the immune system attacks itself and causes inflammation of the blood vessels.
Symptoms
Symptoms vary based on the area of the body the vasculitis affects.
Some symptoms may include:
- fatigue
- fever
- weight loss
- night sweats
- rash
- nerve problems, such as numbness or weakness
Treatment
Treatment depends on the underlying cause of the vasculitis and may include steroids or other immunosuppressant medications.
Learn more about vasculitis here.
4. Raynaud’s disease
Raynaud’s disease causes the arteries that direct blood to the fingers and toes to temporarily narrow.
Symptoms
Symptoms may include a numb, tingling, or burning feeling in fingers, as well as the fingers and toes turning blue or pale white.
Treatment
Learning to avoid the common triggers of the condition — such as cold temperatures, stress, and certain medications — can help ease the symptoms.
Learn more about Raynaud’s disease here.
Neurological
The following neurological conditions may cause numbness in the hands.
5. Brachial plexus injury
The brachial plexus is a complex network of nerves that extend from the spine to each shoulder. This network transmits signals between the spine and the shoulders, arms, and hands.
Shoulder injuries, tumors, and other causes of inflammation can all lead to damage in the brachial plexus, which can result in numbness in a person’s hand.
Infants may experience brachial plexus injuries during birth due to excessive shoulder stretching in the birth canal.
Symptoms
Symptoms may include:
- severe shoulder or arm pain
- numbness in the hands
- weakness and difficulty moving the arms
Treatment
Treatment depends on the underlying cause.
Some people may heal without further intervention, while others may require surgery or physical therapy.
Infants injured during birth may recover by the time they reach 3–4 months of age.
Learn about brachial neuritis here.
6. Fibromyalgia
This condition affects nerve function and causes chronic pain, which may result in tingling and numbness that may closely resemble that of carpal tunnel syndrome (CTS).
Symptoms
Other symptoms may include:
- pain in several areas of the body, which may include the hands
- fatigue
- headaches
- difficulty sleeping
- depression
- stomach problems
Treatment
The treatment options for fibromyalgia include exercise, as this can help ease pain and improve sleep. A doctor may also prescribe antidepressant or anticonvulsant therapy.
Cognitive behavioral therapy may be beneficial for those whose condition does not respond sufficiently to medication.
Learn more about fibromyalgia here.
7. Spinal cord injury
Trauma due to a spinal cord injury can lead to tingling and numbness in the hands and feet. Falls, motor vehicle accidents, blows to the head, gunshot wounds, and several other events can all cause spinal cord injuries.
Symptoms
Symptoms may vary based on the exact area of the body the injury affects. They might include:
- adversely affected movement
- loss of sensation
- loss of large bowel and urinary bladder control
- pain
Treatment
Treatments include supportive therapy and surgical repair when possible.
Some experimental treatments may give those with a spinal cord injury a better chance of regaining their functioning.
Learn more about spinal cord injuries here.
8. Cubital tunnel syndrome
This condition results from excessive stretching or pressure on the ulnar nerve.
Symptoms
Symptoms, specifically in the ring and pinky fingers, may include:
- numbness
- weakness
- tingling
Treatment
Treatment may include wearing a splint while sleeping, to keep the elbow straight from bending. Physical therapy, NSAIDs, and surgery to remove or repair any areas of excessive pressure on the elbow may also be potential treatment options.
Learn more about cubital tunnel syndrome here.
Version:1.0 StartHTML:000000215 EndHTML:000144648 StartFragment:000126848 EndFragment:000144570 StartSelection:000126848 EndSelection:000144560 SourceURL:https://www.medicalnewstoday.com/articles/327483.php Numbness in the hands: Causes and treatments
Musculoskeletal
The following musculoskeletal conditions may cause numbness in the hands.
9. Cervical spondylosis
Cervical spondylosis is also known as osteoarthritis of the neck. This condition occurs when degeneration affects the disks or joints in the neck.
This degeneration can also give rise to cervical spondylotic myelopathy, which occurs when a person has cervical spondylosis symptoms due to compression of the spinal cord or surrounding blood vessels.
Symptoms
Symptoms may include:
- muscle weakness in the extremities
- pain in the hands
- increased urinary urgency, frequency, or hesitancy
- gait disturbance
Treatment
Doctors may prescribe nonsteroidal anti-inflammatory drugs (NSAIDs), muscle relaxants, antidepressants, or corticosteroids. Surgery may help those with severe cases.
Learn more about cervical spondylosis here.
10. Carpal tunnel syndrome
CTS affects around 1% of people who are of working age. CTS occurs when one of the nerves that runs through the carpal tunnel in the wrist becomes compressed.
Symptoms
Symptoms in the hand may include:
- pain
- tingling
- weakness
- affected grip strength
Treatment
Wearing a splint and resting the wrist and hand may help. Sometimes, a doctor may also recommend surgery to reduce pressure over the carpal tunnel.
11. Ganglion cyst
Ganglion cysts are soft lumps that develop in joints around the body. They may cause pain or numbness in the hand.
According to an article in The Journal of the Canadian Chiropractic Association, up to 60–70% of ganglion cysts occur in the wrist.
Symptoms
Symptoms may include a round or oval shaped lump on the wrist or other parts of the body, as well as pain in and around the area.
Treatment
Resting the affected area can help. However, wearing a splint or brace for too long may weaken the muscles in the hand.
Although surgery and aspiration therapy may be an option for some, these methods may not be completely effective.
According to a review in the Journal of Hand Surgery, researchers predict the chance of a cyst returning after surgery as 21%. This rises to 59% for recurrence after aspiration.
Learn more about ganglion cysts here.
12. Lateral epicondylitis
Lateral epicondylitis, or tennis elbow, occurs when the tendons that join the lateral forearm muscles and bone near the elbow become inflamed.
Symptoms
Symptoms may include:
- pain or burning sensations, often on the outside of the elbow
- weak grip strength
- tingling and numbness in the hand
Treatment
Most episodes of lateral epicondylitis will resolve with rest, physical therapy, and NSAIDs. However, in severe instances, a doctor may recommend surgical intervention.
Learn more about lateral epicondylitis here.
Autoimmune
The following autoimmune conditions may cause numbness in the hands.
13. Guillain-Barré syndrome
This condition can cause the body’s immune system to attack nerves outside of the brain and spinal cord. This can result in muscle weakness.
Symptoms
Other symptoms may include:
- pins and needles in the hands and feet
- unsteadiness
- visual problems
- difficulty swallowing
- severe pain that worsens at night
- muscle paralysis
Treatment
Although there is currently no cure for Guillain-Barré syndrome, a doctor might treat the condition using immunoglobulin therapy or a plasma exchange, otherwise known as plasmapheresis.
These treatments may reduce the body’s immune system response.
Learn more about Guillain-Barré syndrome here.
14. Multiple sclerosis
Multiple sclerosis (MS) is a condition that attacks the central nervous system (CNS). The immune system attacks the protective coating of the nerve sheaths, which can eventually destroy the nerves of the CNS.
Symptoms
Symptoms may include:
- numbness and weakness in the limbs
- electric shock-like sensations
- tremors
- unsteady gait
- adversely affected vision
- cognitive difficulties
Treatment
Treatment includes taking immunosuppressant medications such as corticosteroids and other disease-modifying therapies.
Later, doctors may also recommend plasmapheresis to reduce the immune system response.
15. Sjogren’s syndrome
Sjogren’s syndrome is an autoimmune condition that primarily attacks the glands that produce tears and saliva.
Some people may also experience tissue or organ damage in other areas of the body.
Symptoms
Other symptoms may include:
- dry eyes
- dry mouth
- itchy skin
- a chronic cough
- numbness and tingling in the hands and feet
- severe fatigue
Treatment
Treatment depends on the symptoms and which area of the body the condition affects.
For example, a doctor may choose to prescribe eye drops, medications to increase saliva, NSAIDs, or medications to suppress the immune system.
Learn more about Sjogren’s syndrome here.
Other conditions
The following conditions may also cause numbness in the hands.
16. Diabetes
Diabetes is a condition of abnormal blood sugar levels due to dysfunction of the body’s ability to produce enough insulin or respond correctly to it.
The most well-known types of diabetes include:
- Type 1: This type of diabetes develops when the body does not produce insulin.
- Type 2: This type of diabetes occurs when the body does not respond properly to insulin and eventually does not produce enough of it.
- Gestational diabetes: This form of diabetes occurs during pregnancy. It will typically go away after delivery.
Symptoms
Symptoms may include:
- a slow, gradual onset of tingling and numbness in the feet and hands
- extreme sensitivity to touch or temperature changes
- burning or stabbing pains in the hands and feet
Treatment
Making certain lifestyle changes, such as eating a healthful diet and exercising regularly, can help a person maintain steady blood sugar levels.
People with type 1 diabetes may have to inject themselves with insulin. Type 2 diabetes and gestational diabetes may be controllable through the diet or by starting noninsulin medication therapy.
Learn more about diabetes here.
17. Vitamin B-12 deficiency
A study in the journal RMJ found that 90.4% of 110 people with a vitamin B-12 deficiency reported numbness and loss of sensation as symptoms.
Symptoms
Other symptoms may include:
- numbness and tingling in the hands, feet, and legs
- difficulty walking
- an inflamed and swollen tongue
- difficulty thinking clearly
- muscle weakness
- fatigue
Treatment
A doctor may prescribe supplementation with vitamin B-12 either in pill form or as a shot.
Learn more about vitamin-12 deficiency here.
18. Amyloidosis
Amyloidosis is a medical condition that causes abnormal protein to build up in healthy tissue, which can affect the function of the affected area.
It can affect a person’s nervous system, kidneys, liver, heart, and digestive tract.
Symptoms
Symptoms may include:
- fatigue and weakness
- ankle and leg swelling
- shortness of breath
- diarrhea
- unintentional weight loss
- tingling and pain in the hands and feet
Treatment
There is currently no cure for amyloidosis, but treatment might help ease some of the symptoms.
Treatment may depend on the type of amyloidosis a person has. For example, a doctor may recommend chemotherapy medications, immunosuppressant medications, or stem cell transplants.
Learn more about amyloidosis here.
19. Lyme disease
A bite from a tick carrying the Borrelia burgdorferi bacterium can give rise to Lyme disease. This is an infectious condition that affects the nervous system.
Symptoms
The symptoms of Lyme disease can closely resemble those of the flu, such as fever, chills, fatigue, and aching joints.
If a person does not receive treatment, they may experience:
- joint swelling
- an irregular heartbeat
- nerve pain
- shortness of breath
- pain or numbness in the hands and feet
Treatment
Treatment depends on the stage the Lyme disease has reached.
Doctors can treat early stage Lyme disease with antibiotic therapy. Later stage Lyme disease may require antibiotics and supportive treatments.
Learn more about Lyme disease here.
20. Medication side effects
Taking certain medications, such as chemotherapy medications, can cause tingling and numbness in the hands.
Treatment
Some people may experience an improvement in symptoms when they stop taking the medications. However, others may experience permanent tingling and numbness.
Learn more about side effects here.
When to see a doctor
Tingling and numbness can result from a number of medical conditions.
If a person suspects that they or someone near them is having a heart attack or a stroke, they should seek immediate medical attention.
Other symptoms for which a person should seek medical attention include:
- lasting, sudden, or worsening loss of sensation in the hand
- obvious physical deformity of the hand or arm
- pain that gets worse instead of better
- progressive weakness
If a person is concerned about any symptoms related to unusual sensations in their arms or hands, they should see a doctor.
Summary
Numbness in the hands can be the result of a chronic medical condition or acute injury.
A person should talk to their doctor if the numbness appears to be worsening or their symptoms are interfering with their everyday activities.
https://www.medicalnewstoday.com/articles/327483.php#summary

Citrus Plants~ Grow Them Yourself
Grow Citrus Plants from Seed
Can you save seeds from citrus fruit and grow them into plants? Yes. And it really is easy.
Whether the fruit came from a grocery store or farmer’s market, if it has seeds, you can grow them.
Orange, lemons including Meyer lemon, tangerine, clementine, mandarin, lime, kumquat, and grapefruit with seeds are all candidates.
The steps (below) show you how to prepare the seeds, germinate them, and plant them pots.
While citrus is a tropical plant, it can be grown in colder climates as a potted houseplant, spending summers outdoors and winters indoors.
Will they grow fruit?
Yes, it is possible. But only if the plant has just what it needs.
Citrus plants are slow-growing, so it will take several years with good growing conditions to flower and then fruit. Some may never flower.
Most of the citrus fruits we enjoy are hybrids. Grapefruit is a good example. It was an accidental hybrid created from sweet orange (C. sinensis) and pomelo (C. maxima) cross-pollinating.
And that means, while any viable citrus seeds you sow can become beautiful, productive plants, hybrid plants—if they produce fruit—the fruit will not be the same in taste or appearance as the one it came from. This isn’t necessarily a bad thing, it’s just different.
Satsuma tangerines are one of the few citrus plants that bears fruit similar to the parent when grown from seed.
To me, growing a plant from seed all the way to the fruiting stage is a big, fun accomplishment regardless of the taste.
How do commercial growers do it? How do they get the same fruit over and over again?
They use grafted plants. Cuttings are taken from the desired plant (scion) and attached to a rootstock from another citrus variety. This is cloning and it’s essentially the same plant making more fruit.
If you want to be sure your citrus tree grows fruit true to the parent, start with a grafted tree, or use species seeds (not hybrids).
TIP: Winter is a good time to germinate citrus seeds so you have the warmth and light of spring and summer to get the plants established.
Can’t I just toss seeds in some soil and get a plant that way?
Yes, absolutely! But, if you want a 100% success rate—and know ahead of time that the seeds will germinate and do so quickly—instead of waiting many weeks to discover it’s not going to work—do the extra steps listed (below).
How big will a potted citrus tree grow?
It’s up to you. Citrus trees in-ground get quite large but, by growing in containers, growth is somewhat inhibited.
As your plant grows, you can repot it into the next size container until it’s as large as you want it.
Often the weight of the container determines the stopping point because it gets too heavy to lug around.
Once the plant is as large as you want (years from now), you can root prune it to keep it healthy. This is just how it sounds: you remove the plant from the container, trim back the roots, replenish the potting mix, and repot it.
How to Sprout Citrus Seeds
Supplies
- Citrus fruit (choose varieties that have seeds)
- Plant tags and binder clips
- Sieve (for rinsing seeds – optional)
- Paper towel
- Nail clippers
- Food storage container or food bags
- Small cups or plant pots with drainage holes
- Potting mix (see options, below)
- Fertilizer for citrus plants
1 Get Citrus Fruit

Depending on the time of year and your location, you may have quite a variety of fruit to choose from at the store.
When I first tested this out, I bought one of everything because I had never really paid attention to the seeds before.
Be sure to get the ID stickers that come with the fruit in many stores (they have the SKU barcode on them). You want to know exactly what the name of the fruit is, where it’s from, and have this info to further research it (if desired).
Some citrus fruit has nice, plump seeds—that we may not like for eating but work great for germinating.
Others have odd, flat seed-like shells, seemingly devoid of any real growing power. Those are not likely to germinate.
Either way, the next steps will get this sorted out.
2 Make Plant Tags

It’s always helpful to know what you’re growing and keep that info with the seed/ plant for future reference.
I had some old nametag cardstock (Avery nametags 5390) for my printer so I made labels. You can email me to request a copy of my Word template if you want to use mine.
If possible, make the tags water-resistant (so the ink doesn’t run) and get some binder clips to attach them to your seed / plant containers.
I put the SKU stickers on the tags for future reference.
3 Gather Seeds

Cut the fruit in half, top to bottom (if top navel is visible). This avoids damaging too many seeds with the knife, as many seeds tend to form around the middle horizontally.
Gently remove all seeds and set fruit aside.
Discard any seeds that look strange—small, flat, empty shells, etc.
Some fruit has a lot of seeds, others may have few. The grapefruit (photo, above) had just one seed total but it was a good one and grew into a tree.
4 Test for Seed Viability
Place seeds in a small cup of water.
If they sink to the bottom, they should be viable.
If they float, they are not (discard them).
If seeds have jelly-like coating, rinse in a strainer and gently push it off with soft towel.
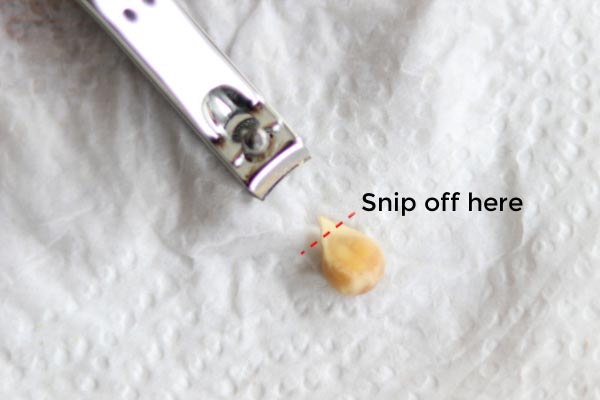
5 Remove Seed Coat

This step can significantly speed up the germination time.
Seeds naturally come with outer protection that prevents unwanted germination. It’s super smart.
For citrus, the seeds have both a hard seed coat (made of two half shells sealed together), protecting the tender seed inside, and there may also be gel around the seed, to provide an additional barrier.
That’s why the seeds don’t sprout in the fruit—the moisture can’t reach them—it’s very cool!
To make germination go faster, we can remove both that gel coat (Step 3) and the hard shell.
Look for the hard, flat pointed end of the seed shell and snip it off with nail clippers, careful not to damage the actual seed inside.
Gently slide your fingernail between the two shell pieces to pry them open/apart and remove them (break them apart).
There are also skin-like layers inside which I leave alone (the seed will grow fine with the skin there). Don’t worry if some skin falls off.
Now you’ve got the soft seed. Be gentle with it!
6 Germinate the Seeds

Moisten a few sheets of paper towel and place the seeds on it, at least an inch apart in all directions to leave room for root growth.
Cover with another layer of moist paper towel and place in a food storage tub with lid or food storage bag.
You want the seeds in contact with warm moisture ongoing. Not too damp. And don’t let them dry out.
Attach your plant tag with a binder clip and place everything in a warm, dark location. I put them in a kitchen cupboard.
I put reminders in my phone to check on them every 2-3 days. Occasionally I forget and weeks later find this crazy-good thing growing in my cupboard!
7 Check on the Seeds

Check the seeds every few days.
If needed, spritz the towel to keep it moist. You want it moist, not dry or soaking wet.
Some will sprout really fast! Others may take weeks. Some will be duds.
Wrap it back up and put it back in the cupboard. We want roots at least an inch long before planting.
8 Plant Seedlings

When there is at least an inch of roots, you can sow the seedlings in potting mix.
The roots often look thick and off-white, like bean sprouts.
In some cases, the plant stem may also start growing.
Plant the sprouted seed in a small cup, pot, or other container with drainage holes.
A regular organic potting mix is good for clay and other non-plastic pots. You could also use a cacti potting mix with plastic pots because they retain more moisture.
I prefer to use separate little pots but sometimes I have limited room for lighting so I will put them all in one container for the first few months.

Position the roots just below the soil surface. Any other growth can be above soil level. Gently press the potting mix around the plant so it’s snugly in place.
Water thoroughly, top up potting mix if needed, and gradually transition plant to a warm, sunny location over a few weeks.

9 Grow a Citrus Tree

How long will it take to grow my citrus plant?
Citrus trees are slow-growers and heavy feeders, doing best with 8-12 hours of sunlight per day.
The less light, the slower the growth.
I started several different hybrids from seed and after 5 months (from the day I removed the seed from the fruit) they range in size from 4 to 7 inches tall.
Keep in mind that reduced light and warmth in winter (indoors) will slow or stall growth.
It may be 3-5 years before flowers form, then pollination can occur (you can help it), and fruit forms.
Small fruit may ripen over several months, larger fruit can take much longer.
You can help the plant grow faster by using supplemental grow lights.
Use fertilizer specifically for citrus plants and follow the application instructions on the label.
Basic Citrus Tree Care Tips – Container Growing
1. Provide 8-12 hours of sunlight each day. Avoid direct, burning sun.
2. Ensure pot has good drainage.
3. Use a slow-release fertilizer for citrus plants as directed.
4. Keep outdoors until temperatures reach 40°F (4°C), then bring inside for winter.
5. Transition the plant (over days or weeks) gradually to avoid shock.
6. Do not allow soil to dry out. Moderate, even moisture is best. Use a moisture meter to be sure.
7. Most citrus plants are self-pollinating; some benefit from pollination assistance (you or insects).
8. Treat spider mites with neem oil spray.
9. Remove mealybugs with rubbing alcohol.
